|
Reports |
  
|
| Show/Hide Hidden Text |
|
Reports |
|
| Show/Hide Hidden Text |
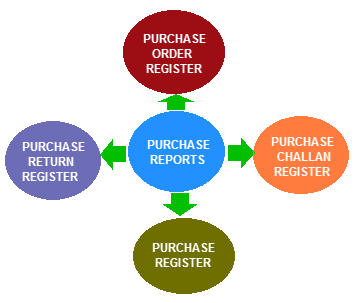
On the entry of Purchase Order, Purchase Invoice, Purchase Chilean, you may get Purchase Order Register, Purchase Register and Purchase Challan Register respectively which contains complete data of all purchase activities. With the help of these reports user can analyse their purchase and can keep the records of all the goods. Through Purchase Registers, user can get list of all Purchase Transactions with the items, brand, size, shades etc details.
|
|
Below given is the buttons in the report viewer. |
|
Configurations (F5) |
Before generating the Purchase Reports set the required configuration. For this click on Configuration button or Press Alt+O. The report's Configuration Form will open up. Set the configuration as required. The shortcut key for configuration button is F5.
|
Copy
|
If user wants to copy the configuration then click on copy button and then select the configurations in Copy From and Copy To then click on Copy button.
|
Create (F2)
|
Select the required configuration made by the user and then click on Create button to create the report. The shortcut key for create button is F2.
|
View (F3)
|
If user wants to see the report's view made by the user then click on View button. The shortcut key for view button is F3.
|
Cancel
|
If user wants to cancel the report made by the user then click on Cancel button.
|
DB - Design
|
This option is used to create a DB design of the reports. Dashboard design is the process of producing a detailed data model of a database. This logical data model contains all the needed logical and physical design choices needed to generate a design in a data definition language.
|
DB - View
|
If user wants to see the DB Design's view made by the user then click on DB Design view button.
|
Close |
If user wants to close the report window then click on close button.
|
Header |
The user can specify what should appear at the top. For this click on Header button or Press Alt+H. A form will open up which will allow the user to select what should appear in header from the Fields List. The user can also specify the default length for the fields selected. Click on Save button or Press Alt+S to save the changes. To see how the header specified will appear click on Pre-View button or Press Alt+P.
|
||
Insert Shapes
|
This option allows user to insert the shapes in header or footer part. After clicking on Insert shapes below given window will appear where user can set the set the required shape in any field of header or footer.
|
||
Footer |
The user can specify what should appear at the bottom. For this click on Footer button or Press Alt+F. A form will open up which will allow the user to select what should appear in footer from the Fields List. The user can also specify the default length for the fields selected. Click on Save button or Press Alt+S to save the changes. To see how the footer specified will appear click on Pre-View button or Press Alt+P.
|
||
Page Formatting
|
The user can set the format of the page for printing i.e. the number of lines that should be printed per page, bottom and top margins ,lines in header and footer etc. Total Lines Per Page- This option limits the total lines the user wants to print per page. 72 lines are default setting.
|
||
Printing With Header & Footer |
This option allows user to print the reports with header and footer part as shown in below given figure.
|
User will find the below given print settings while setting the print settings in print preview of report. |
|||
Options |
If user want to set the printing settings for MS-DOS, then user can go in the Option button, as shown in below given figure. Font- User can set the font for the report. Page Setup-This option allows user to set the page settings for the report. Printer Setup-This option allows user to set the printer settings for the report. Other Print Settings- This option allows user to set the other printing settings for the report.
|
||
Font
|
This option allows user to set the font for the reports. User can set the font, font style and size for the reports. After setting the required option press OK to save the settings.
|
||
Page Setup
|
This option allows user to set the size of the paper, orientation of the report that is landscape or portrait. It also allows user to set the right,left,top,bottom margins for the report.
|
||
Printer Setup
|
This option allows user to set the printer settings for the printing of report. In this user can specify the printer, Can set the orientation for the report and can set the page and its automatic source.
|
||
Other Print Settings
|
This option allows user to set the print view of the reports that is header,footer part of the report and line settings for the report.
|
||
After creating reports,If user have to set the settings or convert the report in some other format then user can select required button given in the tool bar.
|
|||||
|
Setup Column attribute: This option allows the user to choose the columns that are required in the format of the report. For this the user needs to click on setup column attribute button. The Required Columns form will open up and will display the list of the column that can be selected for a report.
|
||||
|
Sort Column: This option allows the user to do the sorting of column according to the user's choice. The possible options that can be set are - Ascending, Descending, Numeric Ascending , Numeric Descending.
|
||||
|
Resize Column: This option allows user to resize the columns in the report. The possible options user can set are- Fit On Screen, Fit To Contents, User Defaults, Defaults. |
||||
|
Copy To Clipboard: Selecting this option allows user to copy the text of the report to the clipboard. Use can select this option and can copy the reports on excel or to any format. |
||||
|
Copy To Microsoft Excel: Selecting this option allows user to copy the reports to Microsoft excel, this option allows user to copy the report in the same format as they are created by the user in the software.
|
||||
|
View As HTML: Selecting this option allows user to see the report in HTML format that is Hyper Text Mark Up Language but to see the reports in HTML format the internet connection is mandatory. |
||||
|
Upload HTML File: Selecting this option will upload the report in HTML format that is Hyper Text Mark Up Language, by selecting this optoion user can directly upload the html file. |
||||
|
Find: This option allows user to find the text in the particular column. Select the column first in which user have to find the text then click on Find button and enter the text which is to be find by the user.
|
||||
|
View Graph: This option shows the graphical representation of the field of report. User can choose the fields for X-axis and Y-axis and can analyse the fields via graphical representation. |
||||
|
Fonts: Set the Font type with this icon. |
||||
|
Print Pre-view: This option allows user to see what a document will look like if printed. Print preview refers to formatting a document for the printer, but then displaying it on the display screen instead of printing it.
|
||||
|
Print: This option allows user to take the print of the report. User can specify the details for printing in the configuration. User can open and print the contents of the reports to see what it looks like, to keep a generic hard copy on file.
|
||||


