![]() This forms enables you to define the different pack sizes with the pack type for the items.
This forms enables you to define the different pack sizes with the pack type for the items.
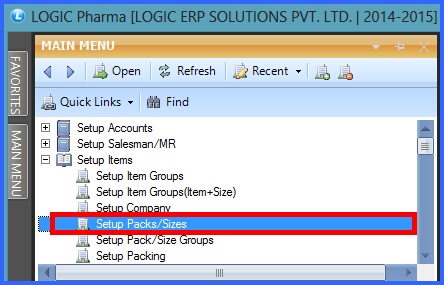
![]() Item Pack/Sizes Creation : Main Menu> Setup Items> Setup Pack/Sizes.
Item Pack/Sizes Creation : Main Menu> Setup Items> Setup Pack/Sizes.
Fig 1. Main Menu |
![]() Creating/Modifying/Deleting Packs
Creating/Modifying/Deleting Packs
Creating/Modifying/Deleting Packs:
In order to create sizes, enter the following details in the form:
![]() Pack/Size : To create a pack enter the Pack/Size name manually,It is a mandatory column,can't be left blank.
Pack/Size : To create a pack enter the Pack/Size name manually,It is a mandatory column,can't be left blank.
![]() Pack Type : Select the pack type from the list. It is either regular or irregular. It is necessary to mention the pack type as it is used in the document size wise printing.
Pack Type : Select the pack type from the list. It is either regular or irregular. It is necessary to mention the pack type as it is used in the document size wise printing.
![]() Skip For Size Difference : Size difference is the specified difference between the different sizes. If the value for size difference is yes then there is no change in the size and the previous record's size get repeated in all the records.
Skip For Size Difference : Size difference is the specified difference between the different sizes. If the value for size difference is yes then there is no change in the size and the previous record's size get repeated in all the records.
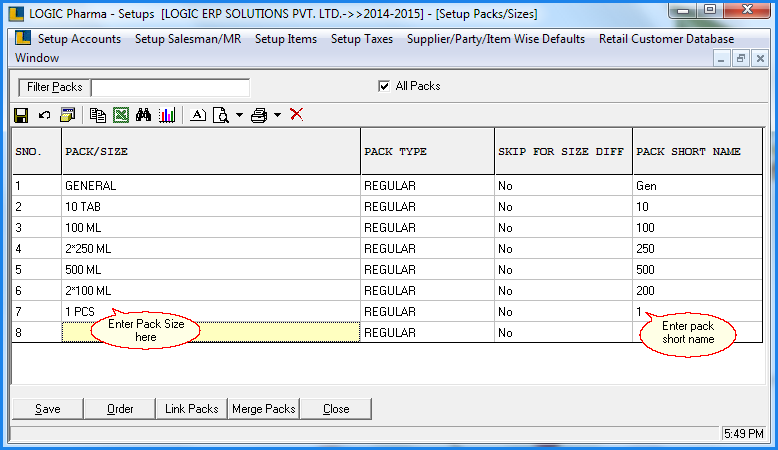
Fig 2. Setup Sizes
|
To save the data entered by the user, user have to press enter button and the cursor should be on next line in the grid. |
How To Modify Packs : To Modify a record select the Size make the necessary changes to the record and then click on Save button or Press Alt+S to save the changes.
How To Delete Packs : To Delete a record select the record and then click on the Red Cross on toolbar. Then click on Save button or Press Alt+S to save the deletion.
Filtering:
The user is given the option to either see the listing of All Sizes or see selective Sizes.
![]() Filter Packs : To view the sorted list of packs. Enter the first character or numeric value of the pack in the text box and then press enter. For Example- If the Size entered is 3 then all the Size beginning with 3 will be displayed in the grid.
Filter Packs : To view the sorted list of packs. Enter the first character or numeric value of the pack in the text box and then press enter. For Example- If the Size entered is 3 then all the Size beginning with 3 will be displayed in the grid.
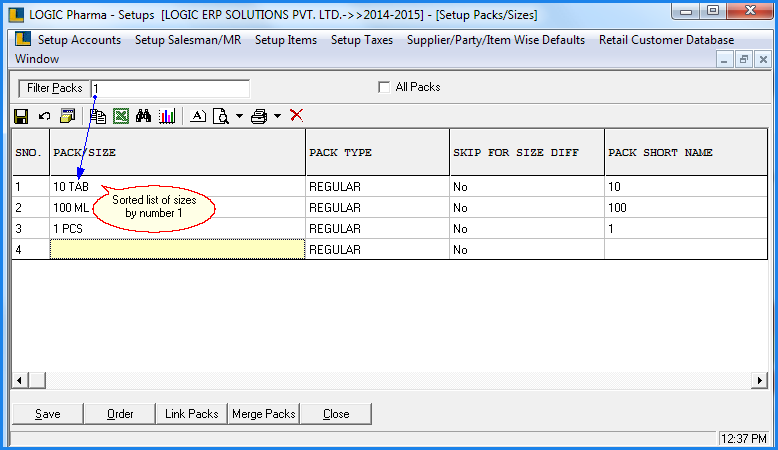
Fig 3. Setup Sizes
![]() All Packs : To view all the Sizes that have been created check the All Packs box. All the Sizes that has been created will be displayed in the grid.
All Packs : To view all the Sizes that have been created check the All Packs box. All the Sizes that has been created will be displayed in the grid.
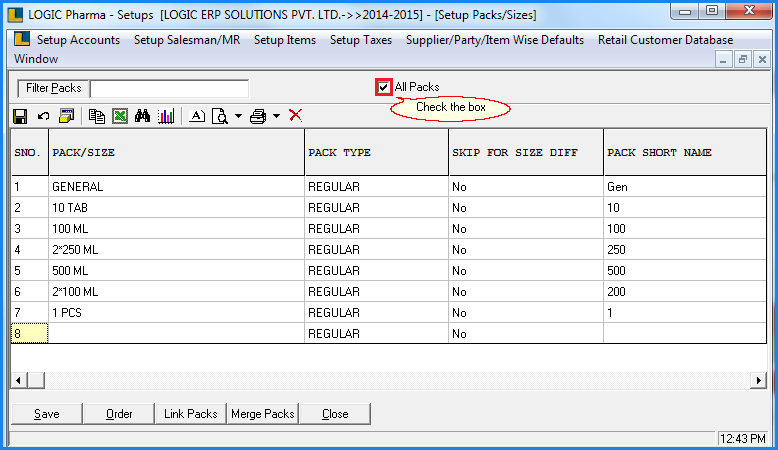
Fig 4. Setup Sizes
|
If the user has specified something in the Filter Pack text box and also has selected the All Packs option then all the Sizes created will be displayed in the grid. |
Link Packs:
Packs/Sizes which are mutually exclusive i.e. a particular item can only be associated with only one of them, can be linked. This linking will be used in reporting/billing/purchase printing. The linked packs will be shown under one column for printing and report viewing purposes.
How To De-Link The Packs : Select the linked packs which you want to de link and click on De Link button to deallocate the sizes.
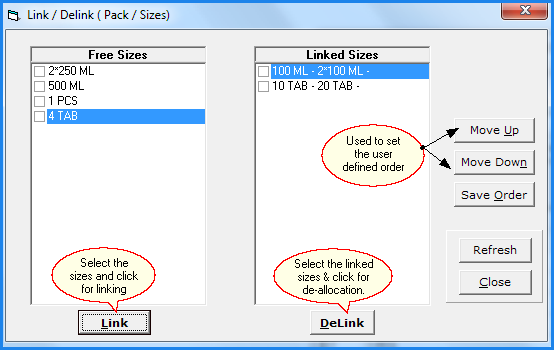
Fig 5. Link Packs
|
User cannot link less than 2 or more than 3 sizes. Error dialog appears if user link less than 2 or more 3 than sizes. |
Merge Packs:
It sometimes so happen that user creates more Sizes then required. In that case the user can merge those Sizes with another existing Size. After this has been done then all the Items that were linked with the Size will now be available under the Size into which they were merged.
How To Merge Packs:
![]() To Merge the Size enter the Name of Size that has to be merged. Then enter the Name of the Size into which the Size has to be merged. Then click on Merge button or Press Alt+M.
To Merge the Size enter the Name of Size that has to be merged. Then enter the Name of the Size into which the Size has to be merged. Then click on Merge button or Press Alt+M.
![]() A message box asking for confirmation will appear.Click on yes to confirm the merge.If the Pack/size has been successfully merged then a Message Box will be displayed indicating successful merge.
A message box asking for confirmation will appear.Click on yes to confirm the merge.If the Pack/size has been successfully merged then a Message Box will be displayed indicating successful merge.
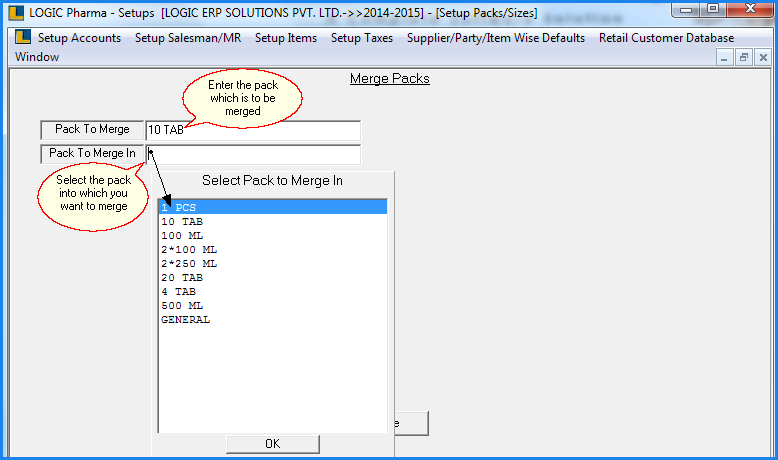
Fig 6. Merge Packs
|
1) If the Size that has to merged does not have any item associated with it then on merging that size with another size will display a Message Box indicating that the "Merge was not complete". 2) The user should be careful will merging items because once the Size has been merged they cannot be unmerged. |
Set Orders:
To set the Order of the Size click on Order button or Press Alt+O.The Pack/Grade Order form will open up which provides the user with different options:
![]() Alphabetical Order : To set the order of Sizes alphabetically, click on Set In Alphabetical Order button or Press Alt+A. Click on Save button or Press Alt+S to save the order that has been set.
Alphabetical Order : To set the order of Sizes alphabetically, click on Set In Alphabetical Order button or Press Alt+A. Click on Save button or Press Alt+S to save the order that has been set.
![]() Move Up : To move a Size higher up in the order select the Size to be moved up and then click on Move Up button or Press Alt+U. Click on Save button or Press Alt+S to save the settings.
Move Up : To move a Size higher up in the order select the Size to be moved up and then click on Move Up button or Press Alt+U. Click on Save button or Press Alt+S to save the settings.
![]() Move Down : To move a Size lower down in the order select the Size to be moved down and then click on Move Down button or Press Alt+D. Click on Save button or Press Alt+S to save the settings.
Move Down : To move a Size lower down in the order select the Size to be moved down and then click on Move Down button or Press Alt+D. Click on Save button or Press Alt+S to save the settings.
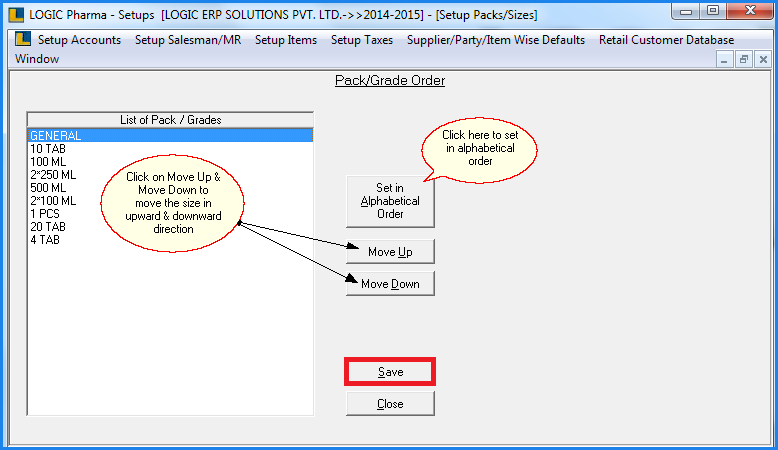
Fig 7. Order