|
GST Returns |
  
|
| Show/Hide Hidden Text |
|
GST Returns |
|
| Show/Hide Hidden Text |
![]() GST Returns: Main Menu > Reports/Queries > Sale Registers > GST Reports/Returns > GST Returns.
GST Returns: Main Menu > Reports/Queries > Sale Registers > GST Reports/Returns > GST Returns.
Fig.1 Main Menu
|
Contents
| ► | GSTR-1 |
| ► | GSTR-2 |
| ► | GSTR-3B |
| ► | GSTR-9 |
| ► | GSTR-ANX1-(NEW) **New Return** |
| ► | GSTR-PURCHASE REGISTER-(NEW) **New Return** |
GST Return Type
In the GST Return Type, select any option and click on generate button. It consist of following options:
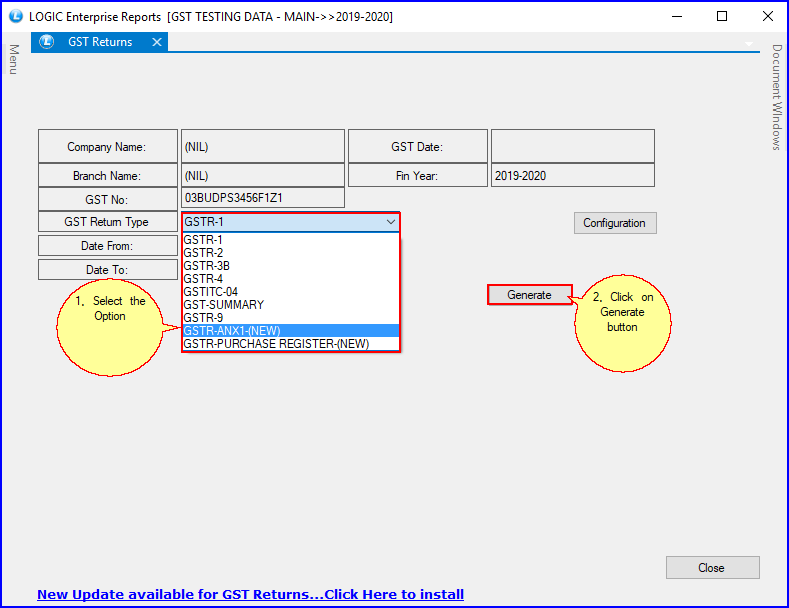
Fig.2 GST Returns
GSTR-1
When you will click on generate button, the following window will appear:
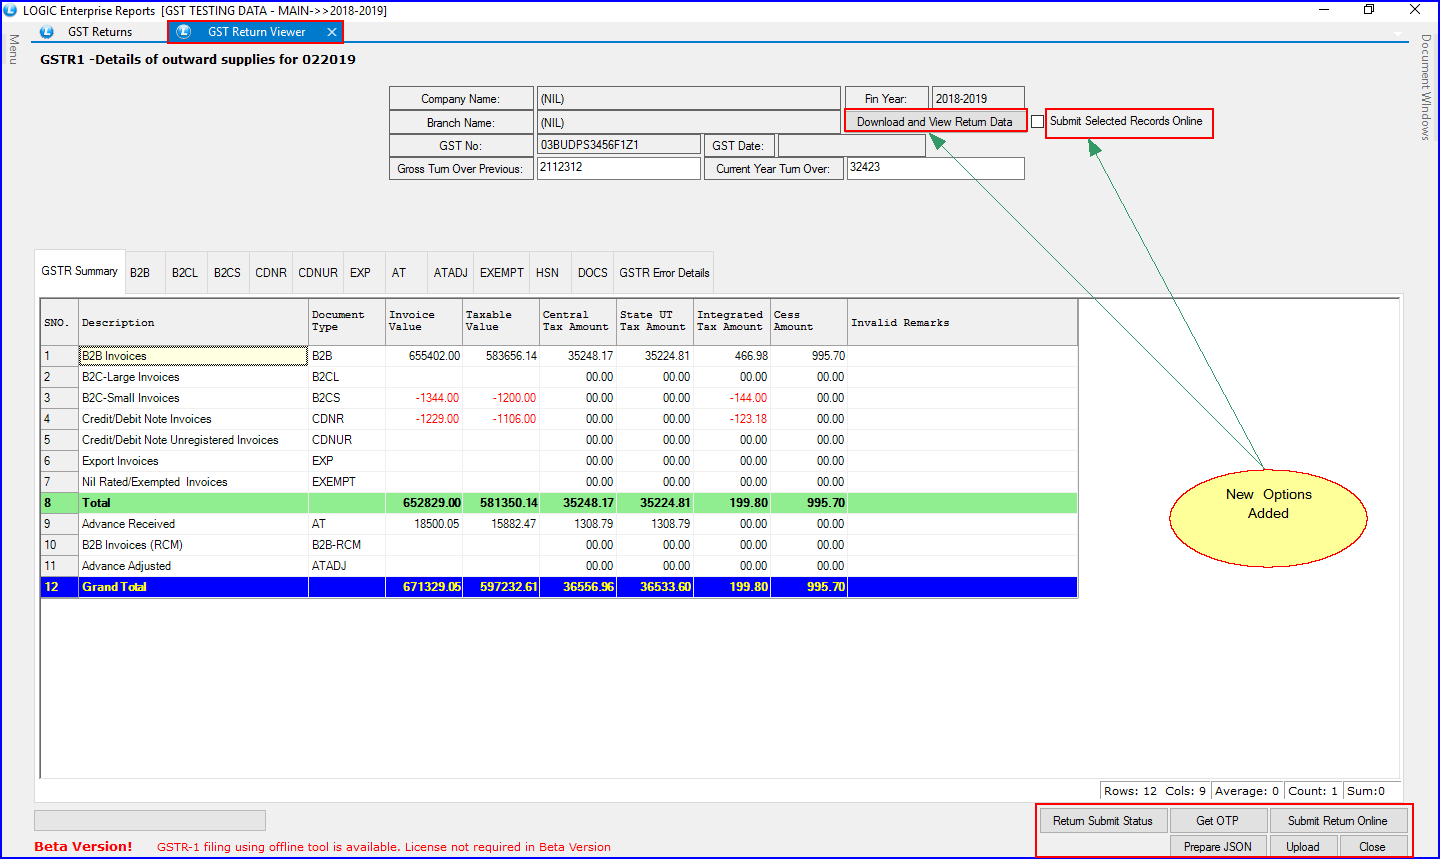
Fig.3 GSTR-1
It consists of following buttons:
![]() Upload: You can upload data to GSTR-1 Govt. template excel sheet. It is uploaded on offline tool, which creates JSON file.
Upload: You can upload data to GSTR-1 Govt. template excel sheet. It is uploaded on offline tool, which creates JSON file.
![]() Prepare JSON: You can create JSON file, which later you have to upload on govt. website.
Prepare JSON: You can create JSON file, which later you have to upload on govt. website.
![]() Submit Return Online: To upload the data on the portal.
Submit Return Online: To upload the data on the portal.
![]() GET OTP: Click this button to receive the OTP number to file return online.
GET OTP: Click this button to receive the OTP number to file return online.
Note: Do not click "Get OTP" button repeatedly. Doing so corrupts the Session and error occurs as mentioned in the picture below:
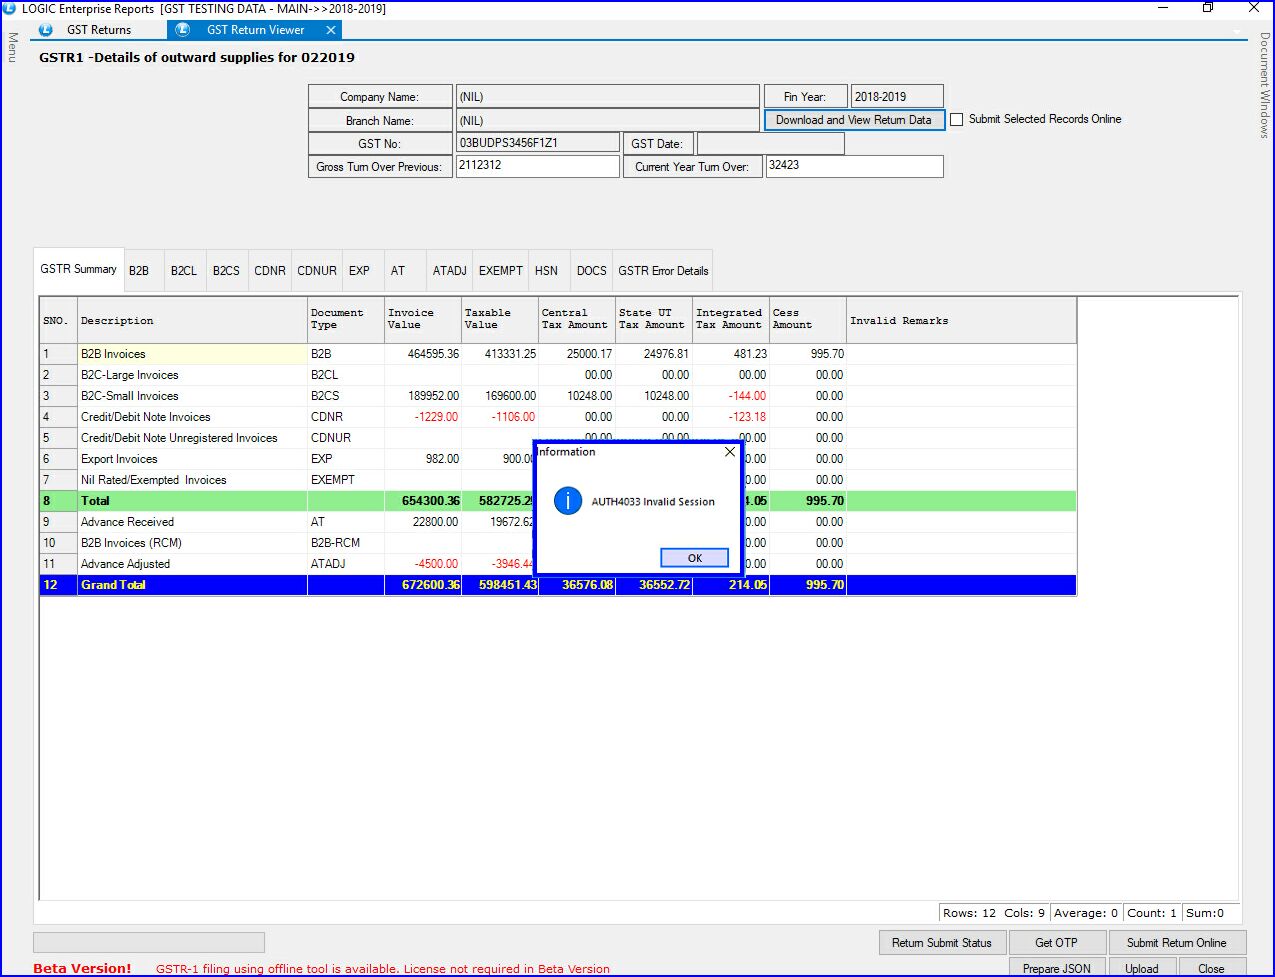
Once Get OTP commands run successfully, the Session remains working till GST Returns Main Form is not closed. If GST Returns Main Form closes, then you have to click the "Get OTP" button to create new session. So if encounter Error or Session Corrupts, then Close GST Returns Main Form and other forms to Close Current Session and re-open GST Returns Main Form, so that new session can be created to Continue working.
***Select Preference Type Error:-***
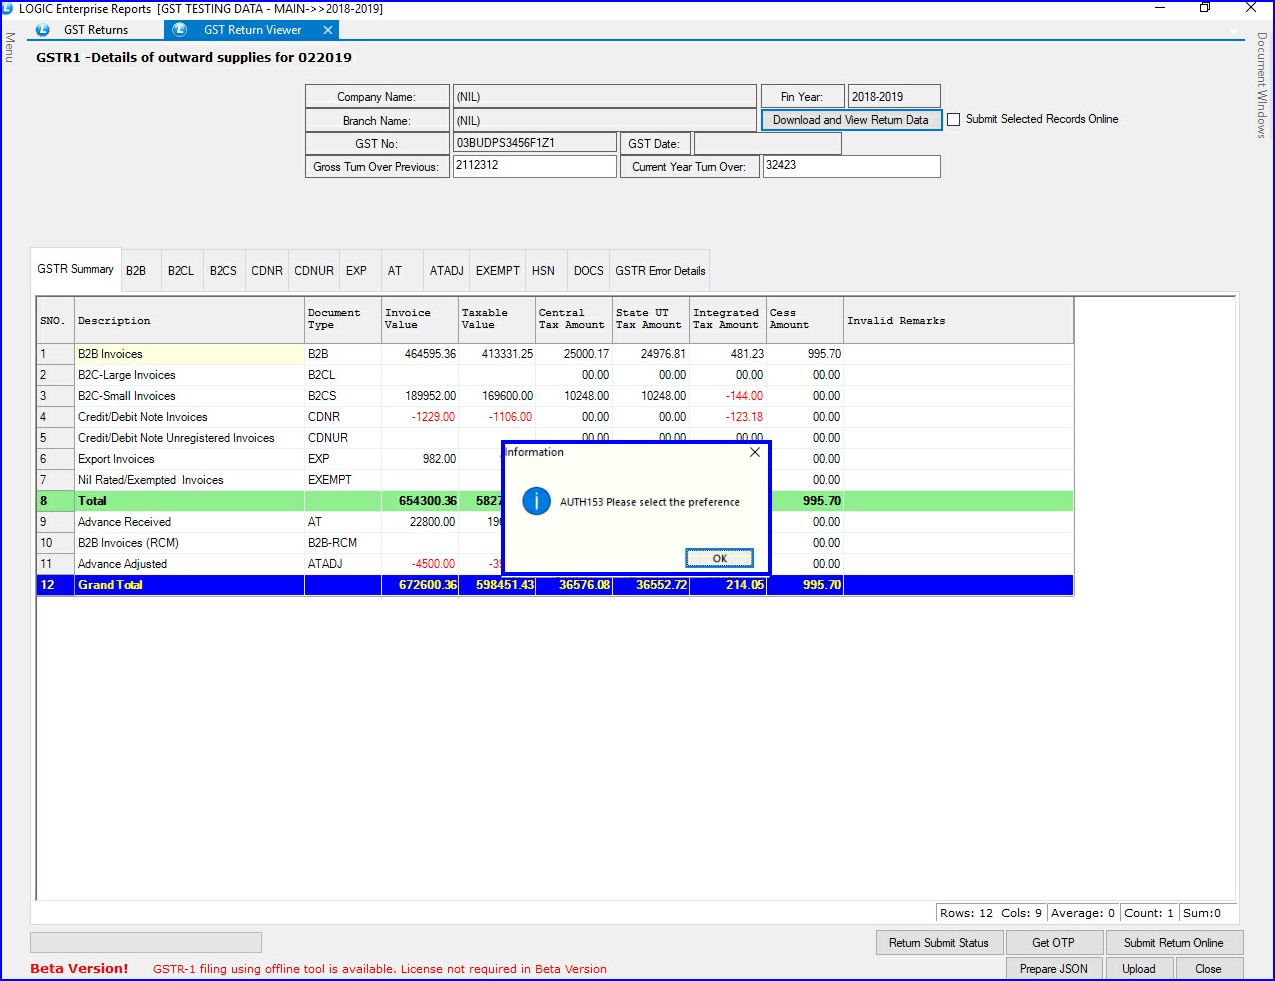
As a new financial year start, then the above mentioned error occurs while Submit Return Online. To prevent this error, Login to Gstn Portal and set preferences for Gstr-1 return type as "Quarterly or monthly return filling type." Once preference is set, it works fine for whole Financial Year.
![]() Return Submit Status: Click this button to know the status of the data submitted. You will know about the errors occurred in the submitted data.
Return Submit Status: Click this button to know the status of the data submitted. You will know about the errors occurred in the submitted data.
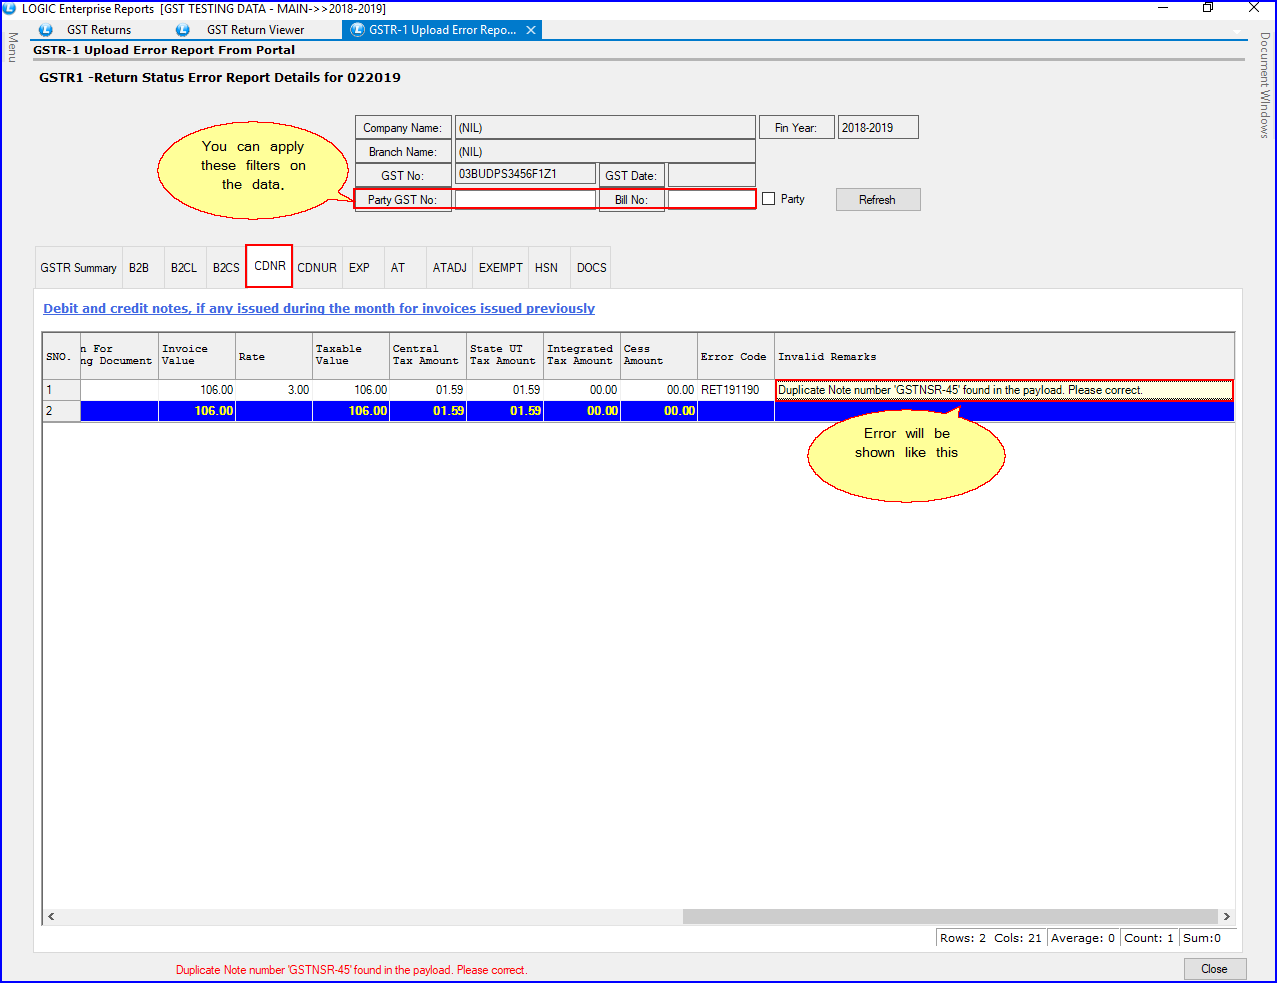
Fig.4 Return Submit Status
![]() Download and View Return Data: Use this button to download and view the uploaded return data. You can also delete data online and can check return delete status also.
Download and View Return Data: Use this button to download and view the uploaded return data. You can also delete data online and can check return delete status also.

Fig.5 Download and View Return Data
1. Delete Data Online: To delete the particular data from online portal.
2. Delete All Section Data Online: To delete entire data from online portal.
3. Return Delete Status: To check the status of deleted data.
![]() Submit Selected Records Online: If you want to upload particular set of records online, then tick this option and click on "Submit Return Online" button.
Submit Selected Records Online: If you want to upload particular set of records online, then tick this option and click on "Submit Return Online" button.
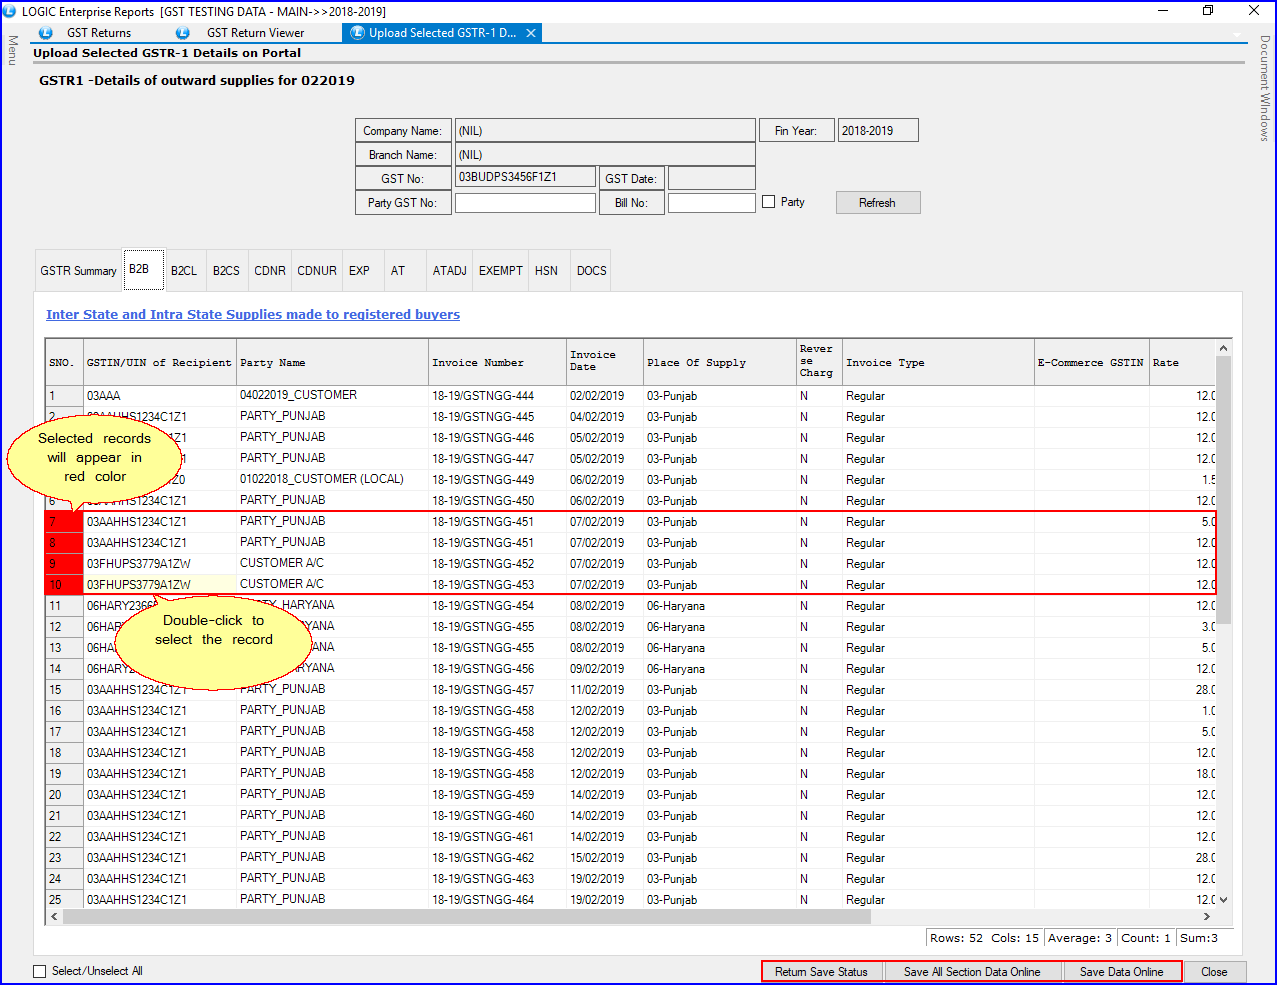
Fig.6 Submit Selected Records Online
1. Save Data Online: To save the selected data online.
2. Save All Section Data Online: To save all the data to the online portal.
3. Return Save Status: To check the status of saved data.
GSTR-2
![]() When you will click on generate button, after selecting GSTR-2 option, you will notice a new option added i.e., 'Reconcilation' button. With this, you can match the GST return data with the information uploaded on the GST portal.
When you will click on generate button, after selecting GSTR-2 option, you will notice a new option added i.e., 'Reconcilation' button. With this, you can match the GST return data with the information uploaded on the GST portal.
![]() Select the GSTR2A File Path among Json/Zip, Excel & Online option.
Select the GSTR2A File Path among Json/Zip, Excel & Online option.
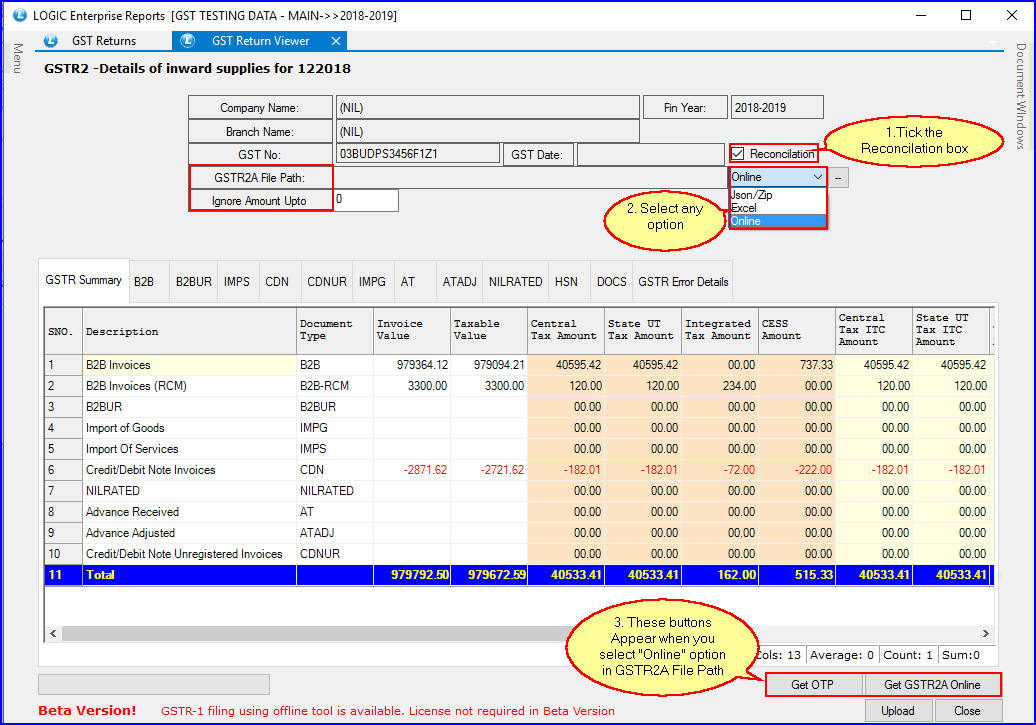
Fig.7 GSTR-2
![]() You can give the Json/Zip or Excel sheet file path, downloaded from GSTN portal.
You can give the Json/Zip or Excel sheet file path, downloaded from GSTN portal.
![]() Click "Get OTP" button to recieve the OTP number to get GSTR2A details from GSTN portal.
Click "Get OTP" button to recieve the OTP number to get GSTR2A details from GSTN portal.
![]() You can get GSTR2A details online from GSTN portal by clicking on 'Get GSTR2A Online' button using API.
You can get GSTR2A details online from GSTN portal by clicking on 'Get GSTR2A Online' button using API.
GSTR-3B
![]() To upload Monthly Return File details on GSTN portal.
To upload Monthly Return File details on GSTN portal.
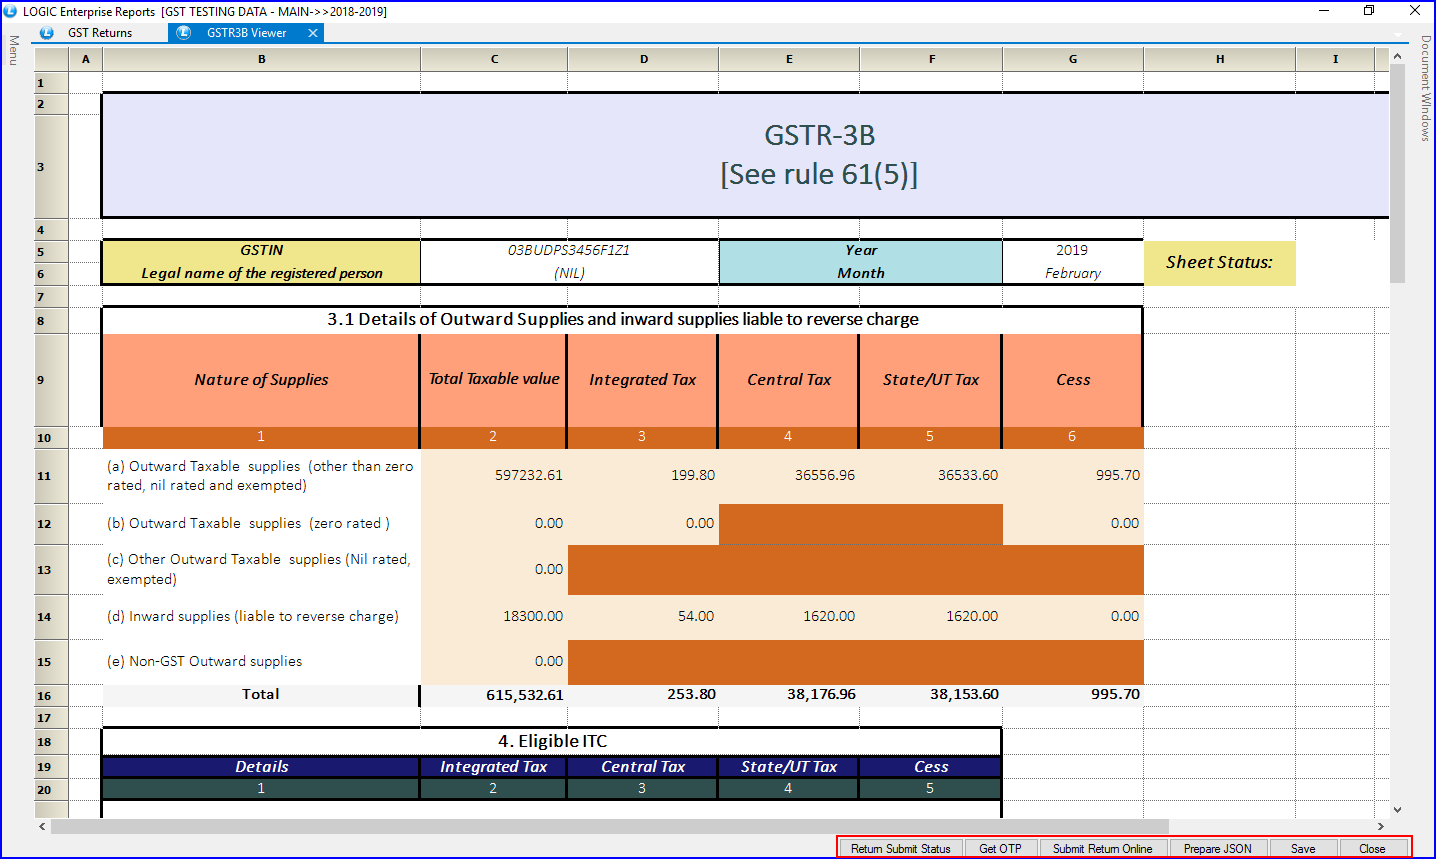
Fig.8 GSTR-3B
GSTITC-04
![]() Mfg_to_JW: To display the details of capital goods or inputs sent to job worker.
Mfg_to_JW: To display the details of capital goods or inputs sent to job worker.
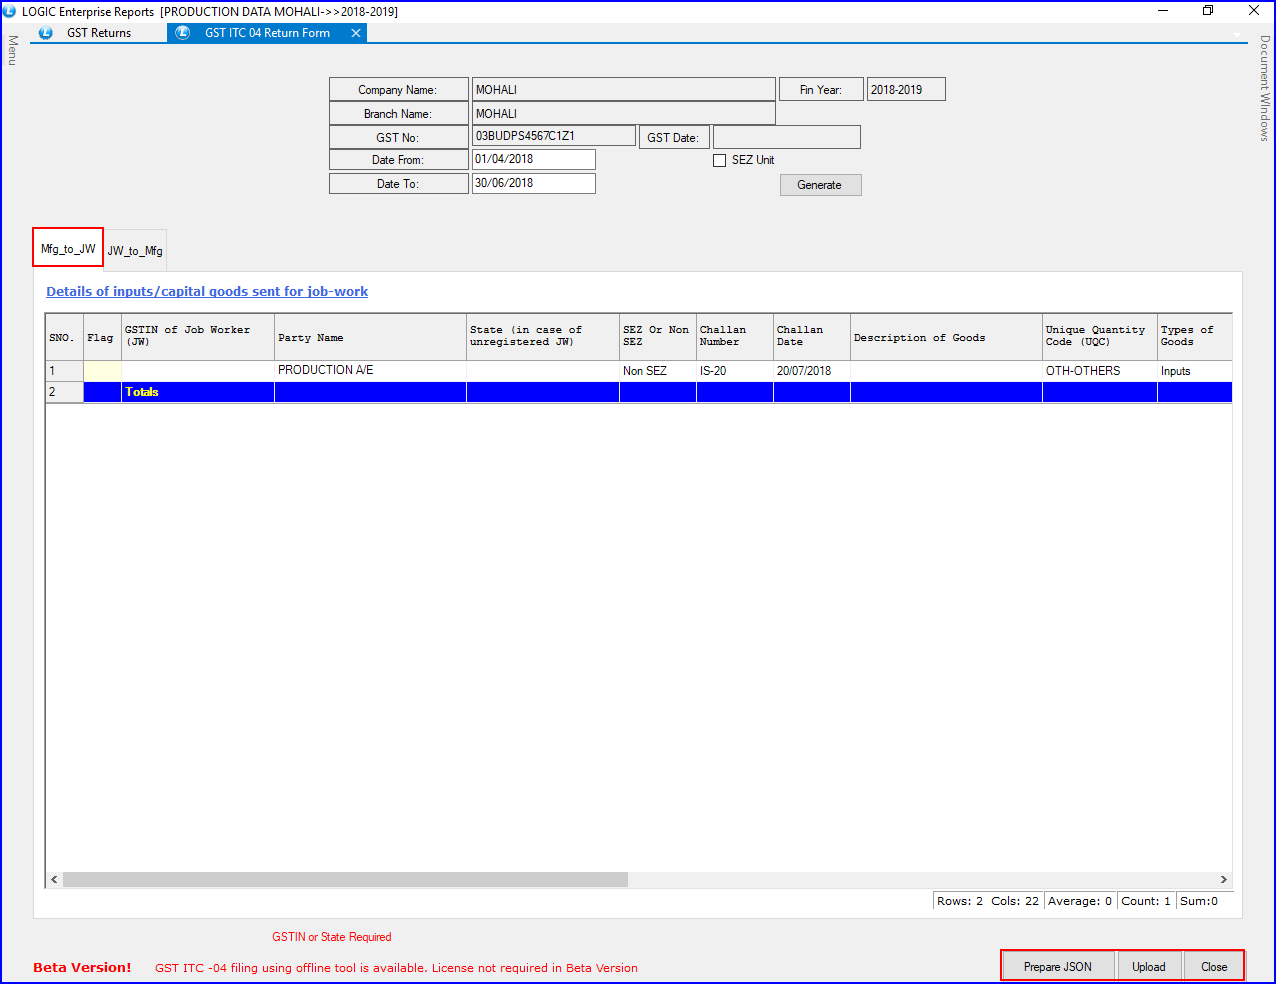
Fig.9 Mfg_to_JW
![]() JW_to_Mfg: To display the details of capital goods or inputs received back from job workers.
JW_to_Mfg: To display the details of capital goods or inputs received back from job workers.

Fig.10 JW_to_Mfg
GST-SUMMARY
![]() To view the GST data details in 'Tax Account' & 'Tax Rate' format.
To view the GST data details in 'Tax Account' & 'Tax Rate' format.
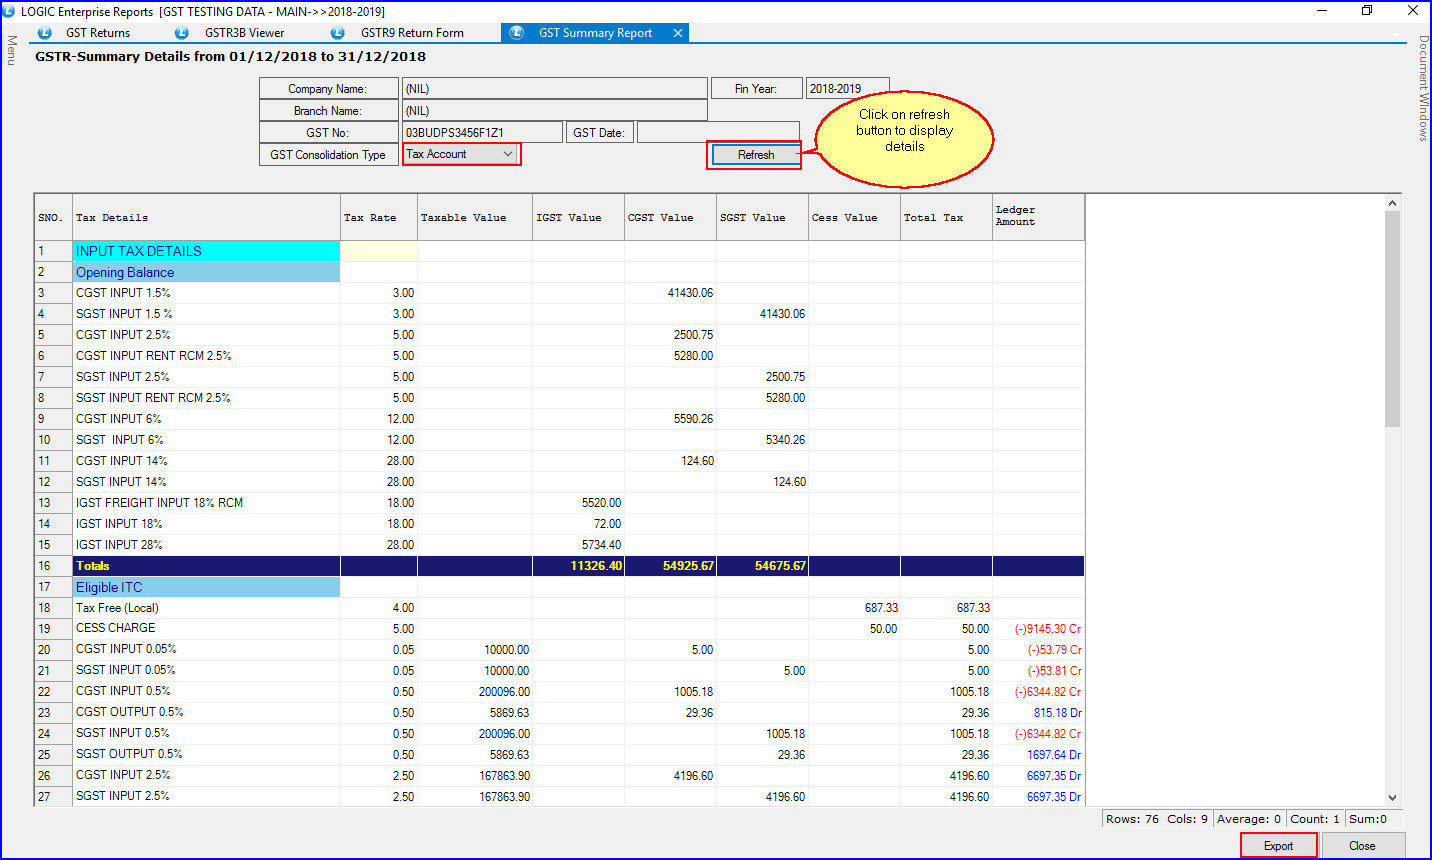
Fig.11 GST-SUMMARY: Tax Account wise
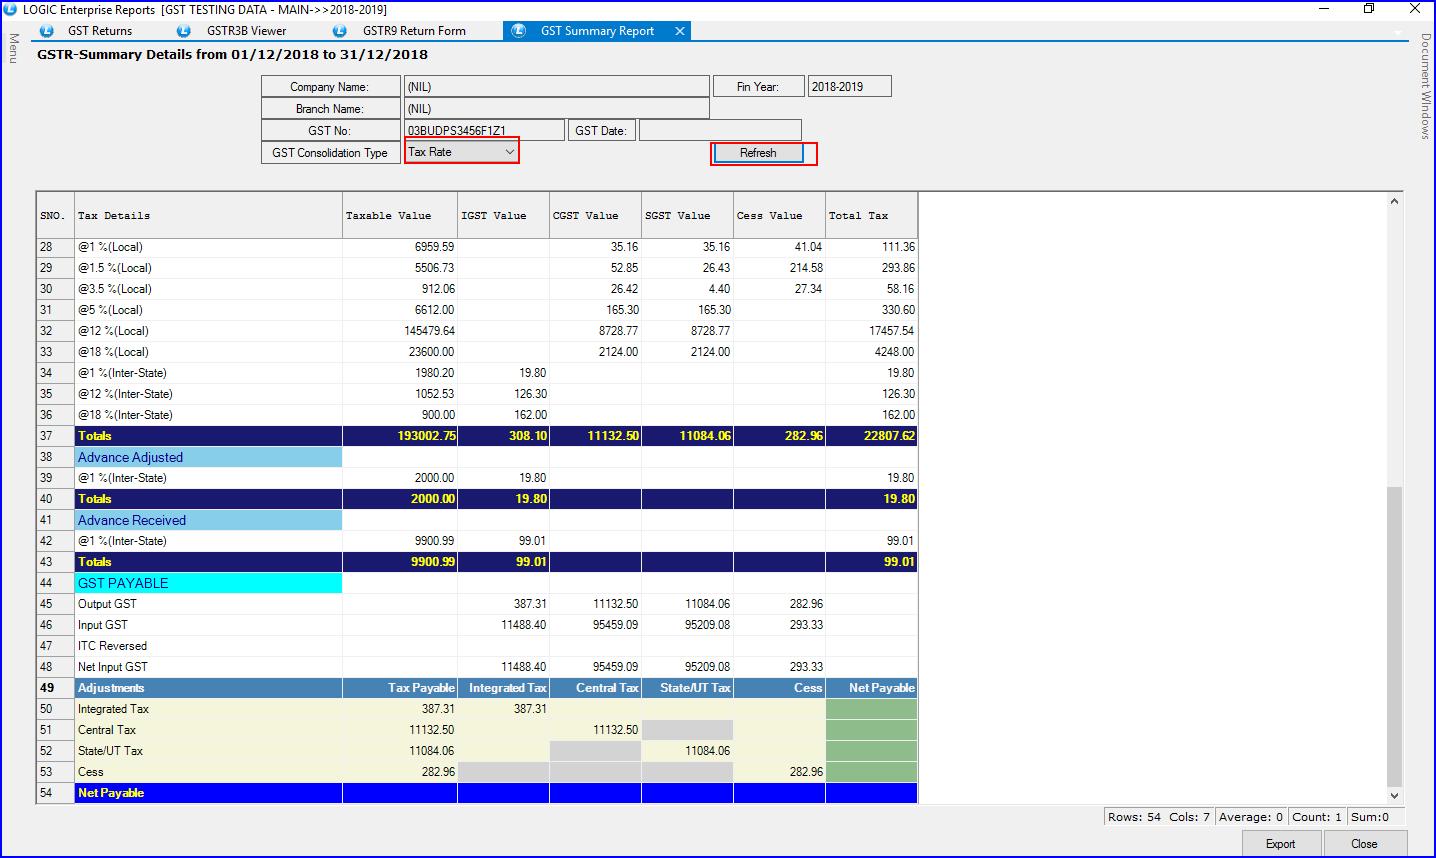
Fig.12 GST-SUMMARY: Tax Rate wise
GSTR-9

Fig.13 GSTR-9
![]() Re-Calculate: To calculate data month-wise & save at backend.
Re-Calculate: To calculate data month-wise & save at backend.
![]() Refresh: To display saved data in report format.
Refresh: To display saved data in report format.
![]() Prepare GSTR-9: TO display data in excel format.
Prepare GSTR-9: TO display data in excel format.
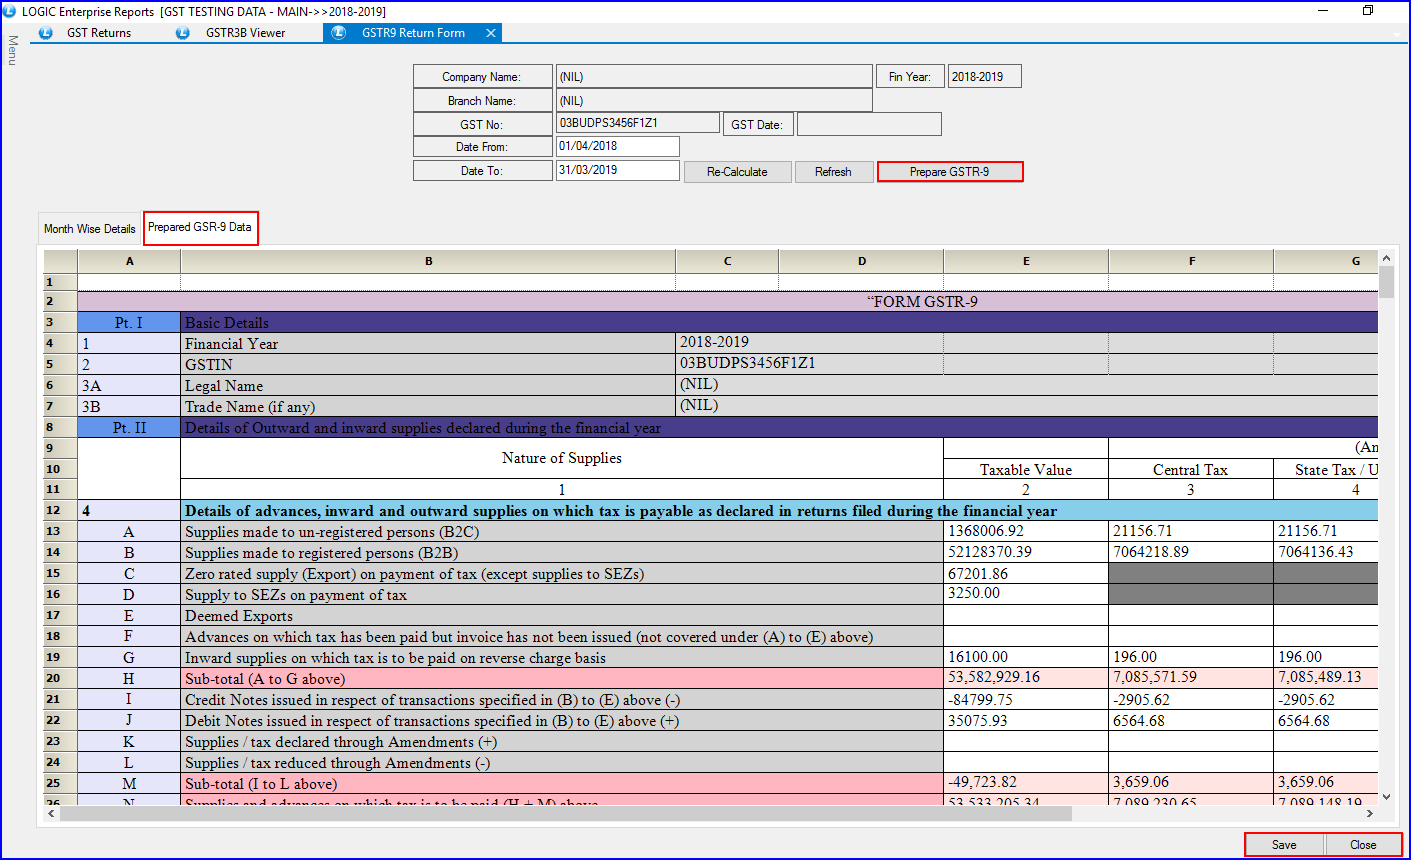
Fig.14 Prepared GSTR-9 Data
GSTR-ANX1-(NEW)
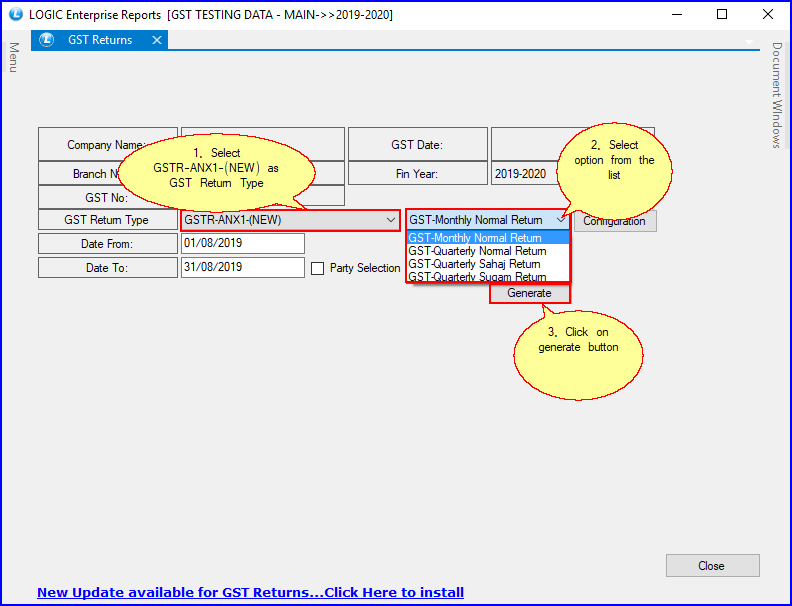
Fig.15 GSTR-ANX1-(NEW)
![]() GST-Monthly Normal Return & GST-Quarterly Normal Return:
GST-Monthly Normal Return & GST-Quarterly Normal Return:
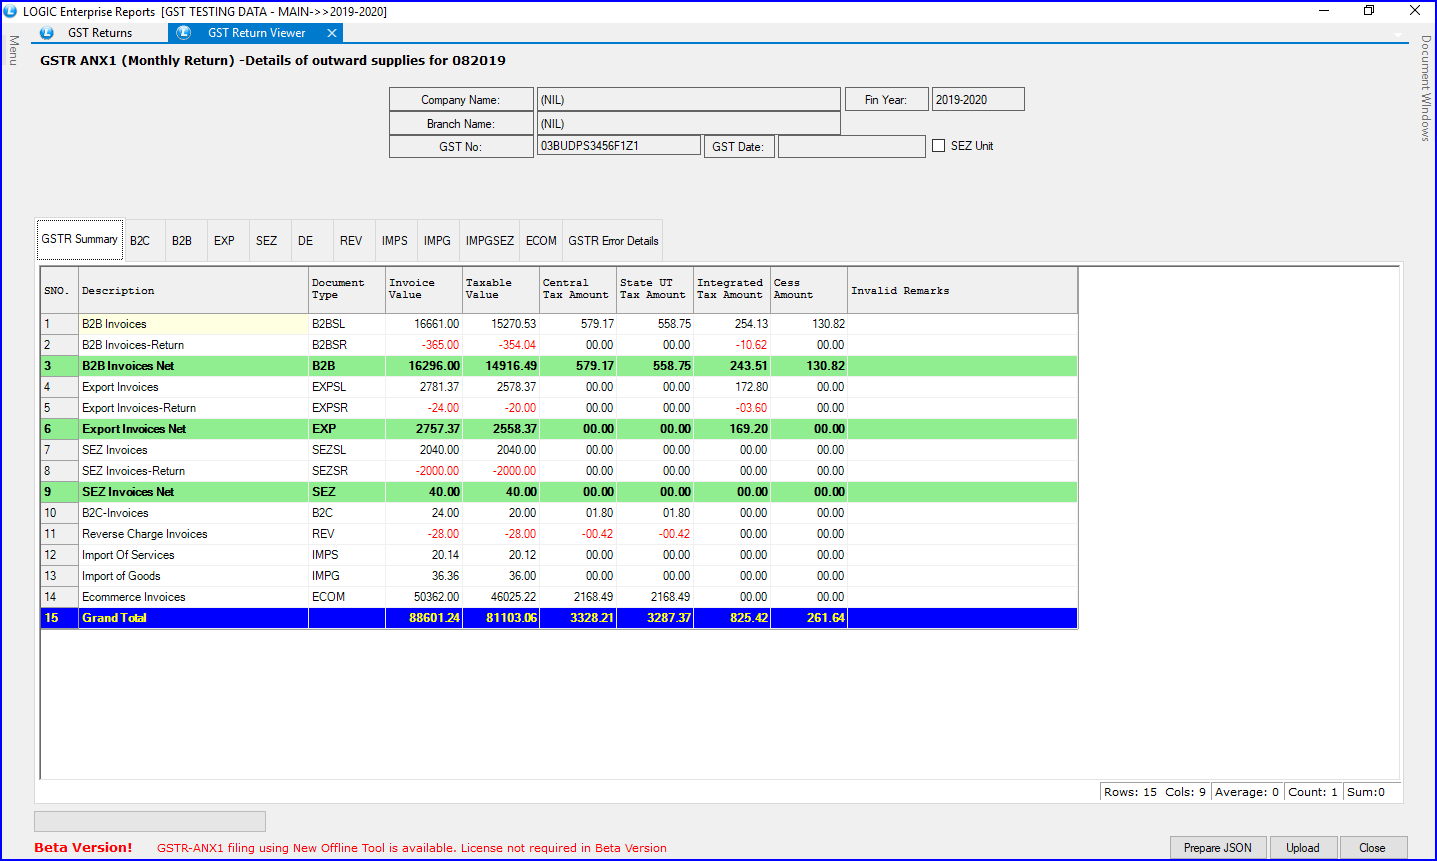
Fig.16 GST-Monthly & Quarterly Normal Return
![]() GST-Quarterly Sahaj Return:
GST-Quarterly Sahaj Return:
Sahaj can be opted only if you have outward supplies under B2C category and inward supplies including supplies attracting reverse charge only.
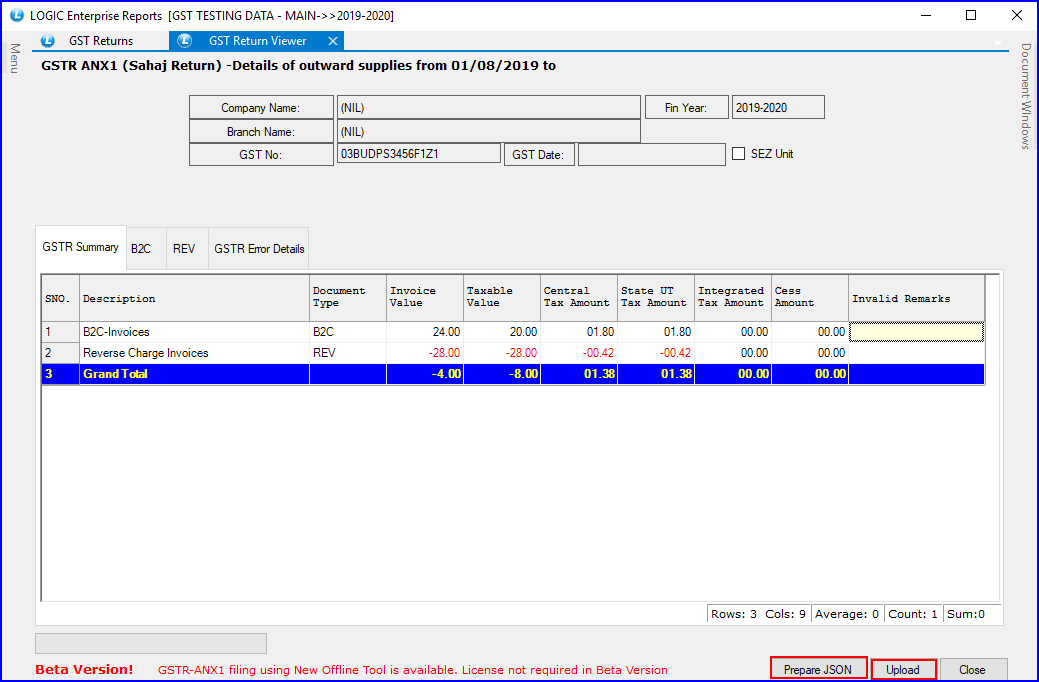
Fig.17 GST-Quarterly Sahaj Return
![]() Prepare JSON: You can create JSON file, which later you have to upload on govt. website.
Prepare JSON: You can create JSON file, which later you have to upload on govt. website.
![]() GST-Quarterly Sugam Return:
GST-Quarterly Sugam Return:
Sugam can be opted only if you have outward supplies under B2B & B2C categories and inward supplies including supplies attracting reverse charge only.
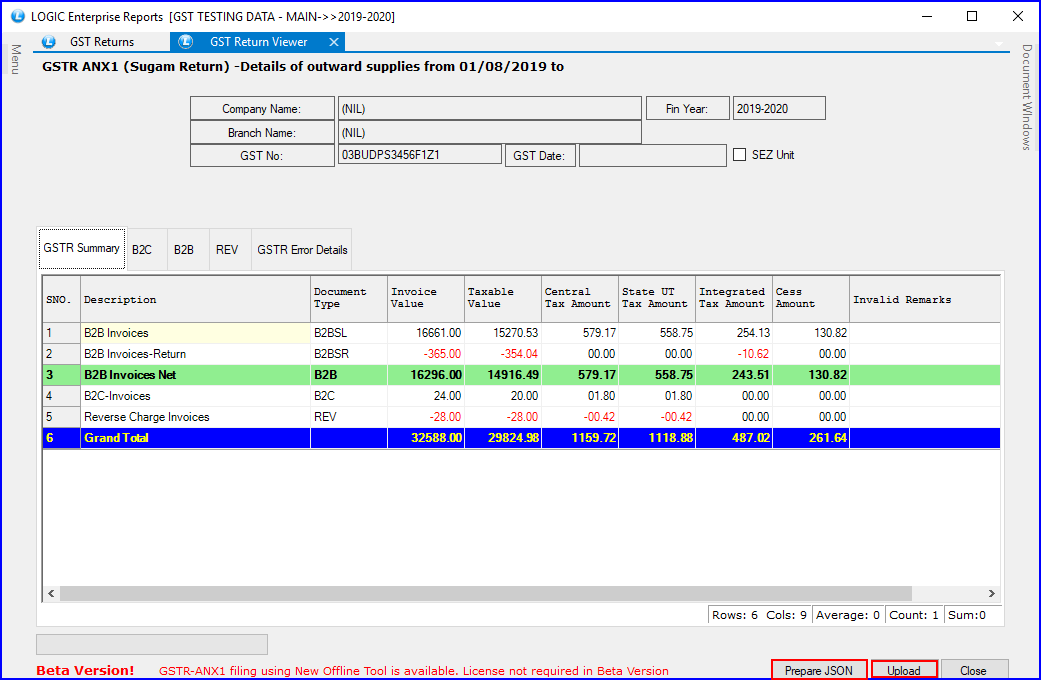
Fig.18 GST-Quarterly Sugam Return
GSTR-PURCHASE REGISTER-(NEW)
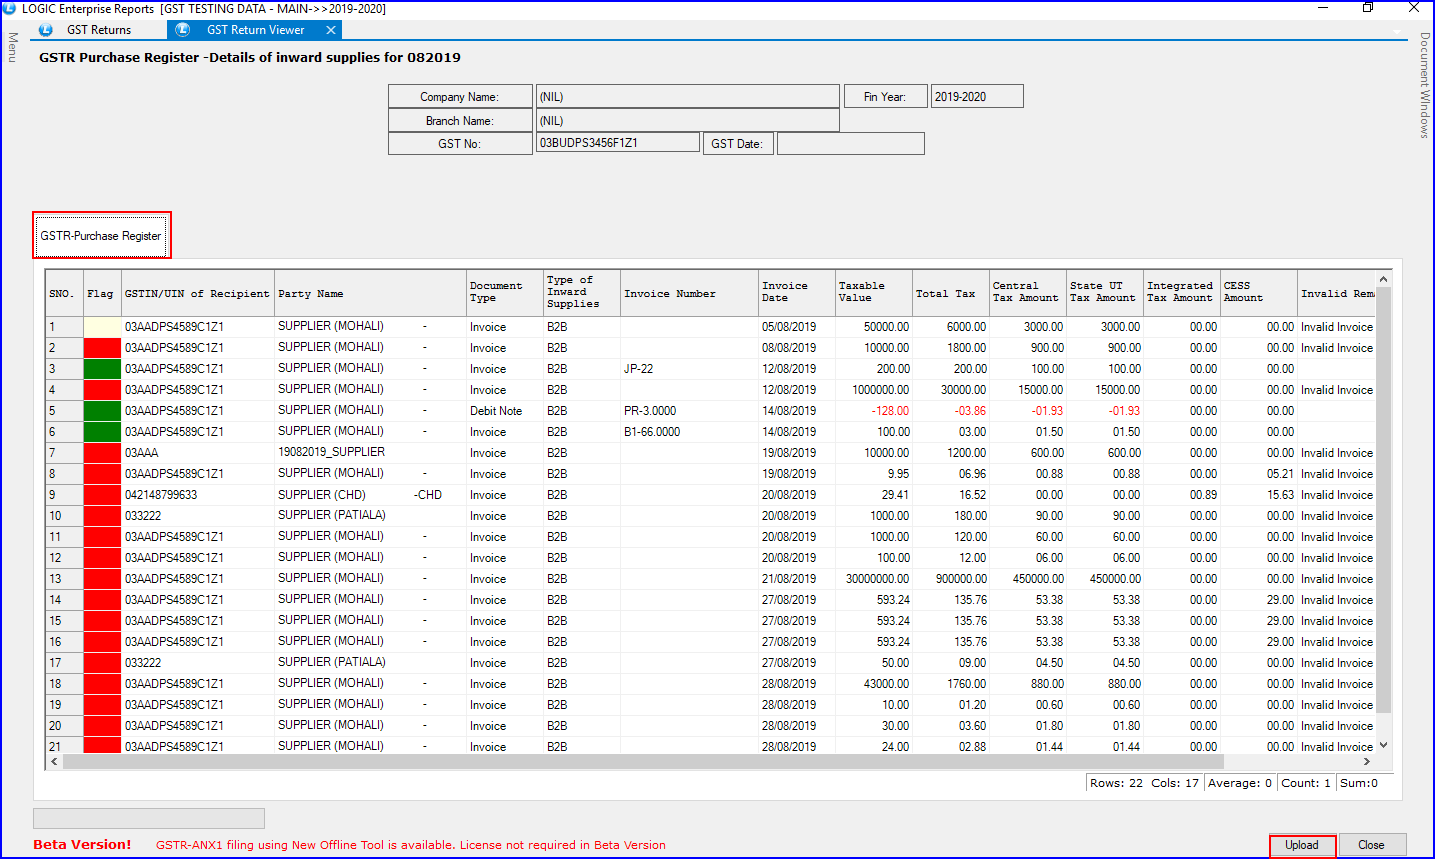
Fig.19 GSTR-Purchase Register-(NEW)
GST Return Configuration
![]() A new screen will appear on your screen.
A new screen will appear on your screen.
![]() Click on the Configuration button.
Click on the Configuration button.
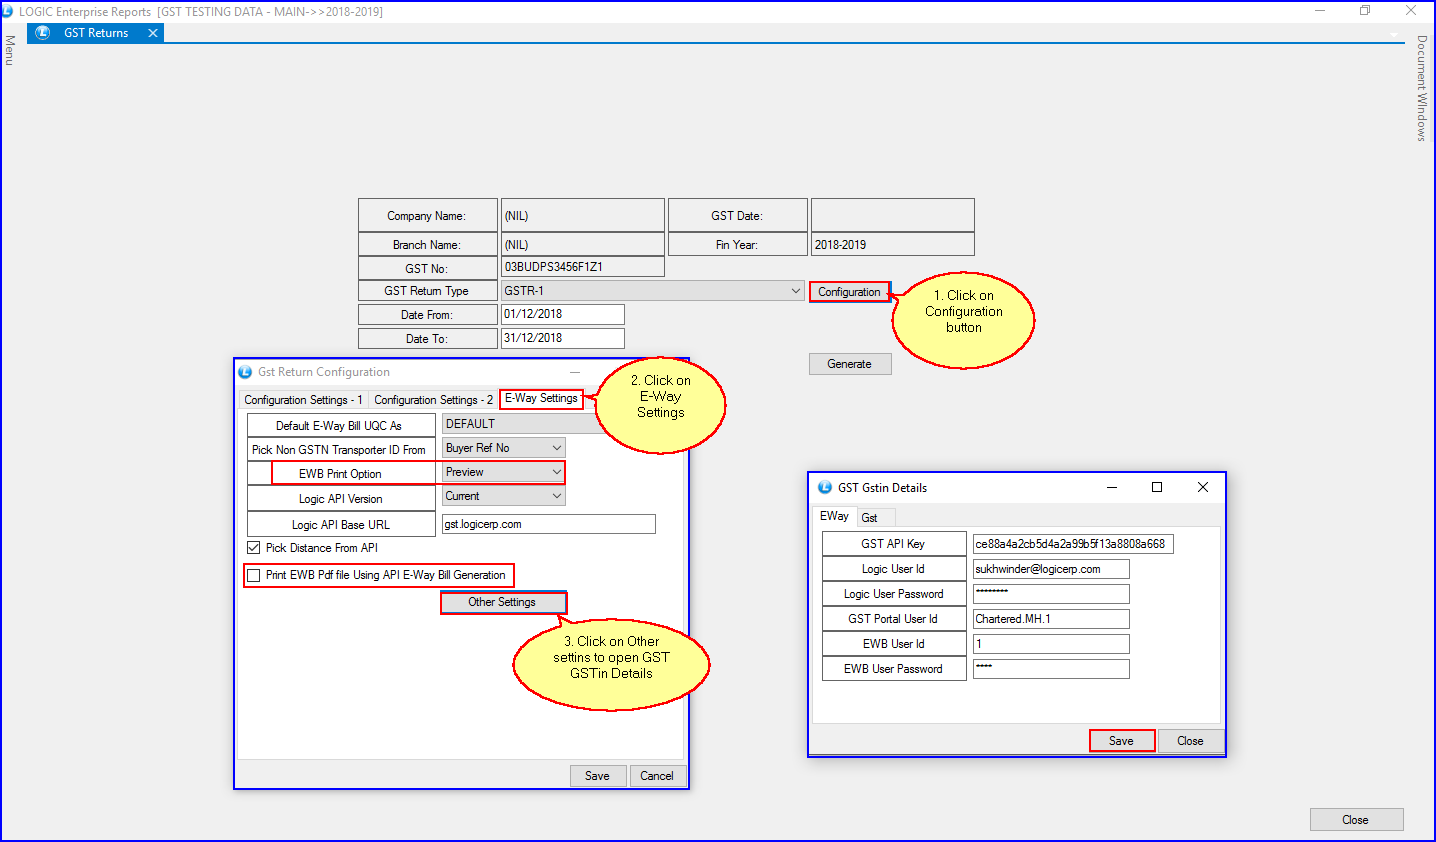
Fig.20 E-Way Settings
![]() Select Default E-Way Bill UQC As. Select the unit you want to set.
Select Default E-Way Bill UQC As. Select the unit you want to set.
![]() In the EWB Print Options, four options are added: Preview, Print, Prompt for Print, Prompt for Preview.
In the EWB Print Options, four options are added: Preview, Print, Prompt for Print, Prompt for Preview.
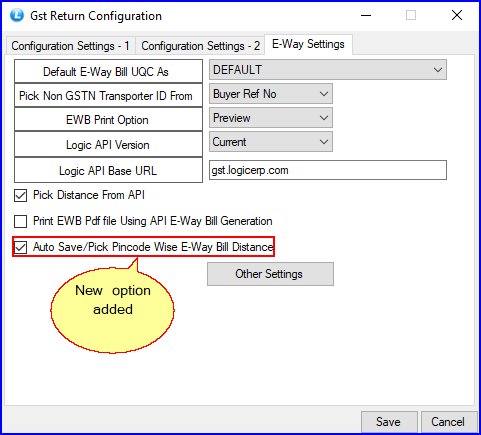
Fig.21 EWB Print Options
![]() Auto Save/Pick Pincode Wise E-Way Bill Distance option:- With this option, you can Generate GST e-Way Bill number according to distance entered against Source and Destination Pin-code. Once entered, it will auto-save in database and thereafter, distance will get retrieved automatically from saved records against that source and destination pin-code.
Auto Save/Pick Pincode Wise E-Way Bill Distance option:- With this option, you can Generate GST e-Way Bill number according to distance entered against Source and Destination Pin-code. Once entered, it will auto-save in database and thereafter, distance will get retrieved automatically from saved records against that source and destination pin-code.
![]() Use "Print EWB Pdf file Using API E-Way Bill Generation" check-box to print slips while generating the E-Way bill using API at the same time.
Use "Print EWB Pdf file Using API E-Way Bill Generation" check-box to print slips while generating the E-Way bill using API at the same time.
![]() Logic API Version will enable you to select the API version among current, previous, and demo version.
Logic API Version will enable you to select the API version among current, previous, and demo version.
Other Settings
![]() Click on Other Settings to open GST GSTin Details window.
Click on Other Settings to open GST GSTin Details window.
![]() Here, you will fill the details regarding GST API key, which will be provided by LOGIC itself. You have to generate the GST Portal User id, and EWB User id & password from GST government site.
Here, you will fill the details regarding GST API key, which will be provided by LOGIC itself. You have to generate the GST Portal User id, and EWB User id & password from GST government site.
![]() Also, insert the Logic User id and password details.
Also, insert the Logic User id and password details.
![]() Click on 'Save button'.
Click on 'Save button'.
