![]() The defaults for the Cash/Bank Receipts/Payment can be set by using the Cash/Bank Configuration. The configuration lets the user set some defaults like mentioning the columns that should be displayed, the header and footer for the printing, automatic generation of Receipt No. etc.
The defaults for the Cash/Bank Receipts/Payment can be set by using the Cash/Bank Configuration. The configuration lets the user set some defaults like mentioning the columns that should be displayed, the header and footer for the printing, automatic generation of Receipt No. etc.
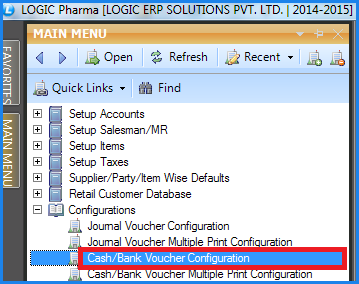
![]() Cash/Bank Voucher Configuration : Main Menu> Configuration> Cash/Bank Voucher Configuration.
Cash/Bank Voucher Configuration : Main Menu> Configuration> Cash/Bank Voucher Configuration.
Fig1. Main Menu |
Print Options:
![]() Enter the name of the Configuration in the select box and then set the defaults. If the configuration already exist then select the name of the configuration from the select box and set the defaults for that configuration.
Enter the name of the Configuration in the select box and then set the defaults. If the configuration already exist then select the name of the configuration from the select box and set the defaults for that configuration.
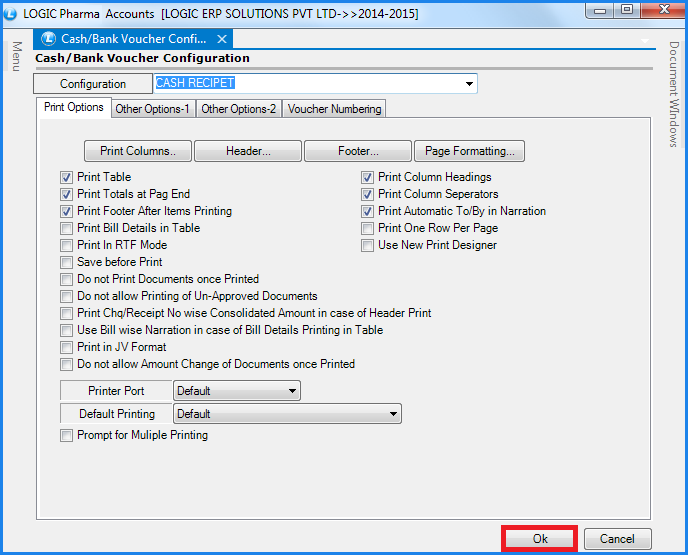
Fig 2. Cash/Bank Voucher Configuration (Print Options)
The Report Options lets the user set the following defaults:
![]() Print Columns- This option allows the user to choose the columns that are required in the printed format of the Receipt/Payments. For this the user needs to click on Print Columns button or Press Alt+P. The Required Column form will open up and will display the list of the columns that can be printed.
Print Columns- This option allows the user to choose the columns that are required in the printed format of the Receipt/Payments. For this the user needs to click on Print Columns button or Press Alt+P. The Required Column form will open up and will display the list of the columns that can be printed.
![]() Header- The user can specify what should appear at the top of the Receipt. For this click on Header button or Press Alt+H. The Header form will open up.
Header- The user can specify what should appear at the top of the Receipt. For this click on Header button or Press Alt+H. The Header form will open up.
![]() Footer- The user can specify what should appear at the bottom of the Receipt. For this click on Footer button or Press Alt+F. The Footer form will open up.
Footer- The user can specify what should appear at the bottom of the Receipt. For this click on Footer button or Press Alt+F. The Footer form will open up.
![]() Page Formatting- The user can set the format of the page for printing i.e. the number of lines that should be printed per page, bottom and top margins, lines in header and footer etc. For this click on Page Formatting button or Press Alt+P. The Page Formatting form will open up.
Page Formatting- The user can set the format of the page for printing i.e. the number of lines that should be printed per page, bottom and top margins, lines in header and footer etc. For this click on Page Formatting button or Press Alt+P. The Page Formatting form will open up.
The following defaults can be set for printing :
![]() Print Table- In order to print the receipts with all its details the option Print Table should be checked otherwise nothing will be printed.
Print Table- In order to print the receipts with all its details the option Print Table should be checked otherwise nothing will be printed.
![]() Print Column Heading- During the printing of the Receipt the user can choose whether to print the Column Names or not.To print the Column Name select the Print Column Heading and for not printing the Column Names do not select the option to Print Column Heading.
Print Column Heading- During the printing of the Receipt the user can choose whether to print the Column Names or not.To print the Column Name select the Print Column Heading and for not printing the Column Names do not select the option to Print Column Heading.
![]() Print Totals At Page End- The totals can be printed at page end if the option Print Totals At Page End is checked.
Print Totals At Page End- The totals can be printed at page end if the option Print Totals At Page End is checked.
![]() Print Column Separators- The column values can be separated by line so that the user can clearly demarcate the values of the indiviual columns.This can be done by checking the Print Column Separators option.
Print Column Separators- The column values can be separated by line so that the user can clearly demarcate the values of the indiviual columns.This can be done by checking the Print Column Separators option.
![]() Print Footer After Items Printing- The footer specified by clicking on Footer button can be printed either after all the itmes have been printed or before that.To print the footer after all the items have been printed check the option Print Footer After Items Printing.
Print Footer After Items Printing- The footer specified by clicking on Footer button can be printed either after all the itmes have been printed or before that.To print the footer after all the items have been printed check the option Print Footer After Items Printing.
![]() Print Automatic To/By In Narration- A Narration is a short explanation of the nature of the transaction which should always be given before the Journal Entry is closed.The user can choose to add the clause "TO" and "BY" automatically to the narration formula so that it can be known that what exactly was the nature of transaction.For this check the option Print Automatic To/By In Narration.
Print Automatic To/By In Narration- A Narration is a short explanation of the nature of the transaction which should always be given before the Journal Entry is closed.The user can choose to add the clause "TO" and "BY" automatically to the narration formula so that it can be known that what exactly was the nature of transaction.For this check the option Print Automatic To/By In Narration.
Other Options-1:
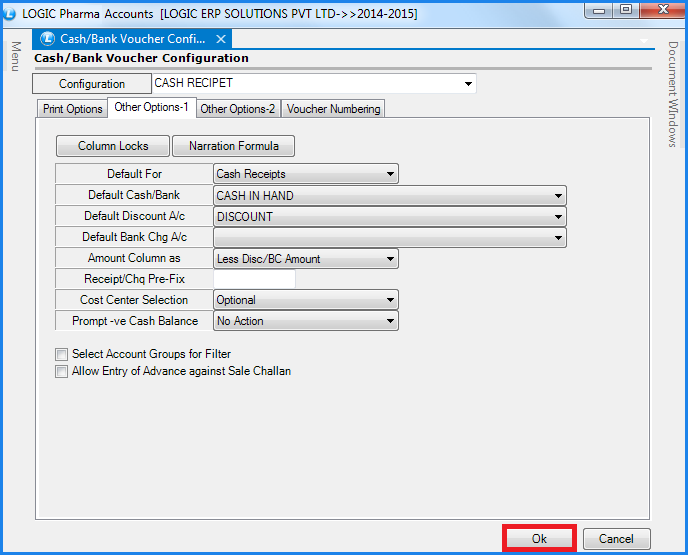
Fig 3. Cash/Bank Voucher Configuration (Other Options-1)
![]() Column Locks- Depending upon the user requirements some columns can be locked.The columns which will be locked will not appaer in the Cash/Bank Receipt/Payment forms and the user will not have to enter their values.For this click on Column Locks button or Press Alt+L.The Column Locks form will open up.Select the fields which should not appear in the respective forms and click on Save button or Press Alt+S to save the settings.
Column Locks- Depending upon the user requirements some columns can be locked.The columns which will be locked will not appaer in the Cash/Bank Receipt/Payment forms and the user will not have to enter their values.For this click on Column Locks button or Press Alt+L.The Column Locks form will open up.Select the fields which should not appear in the respective forms and click on Save button or Press Alt+S to save the settings.
![]() Narration Formula- The user can specify the values of which columns should define the narration.For this click on Narration Formula or Press Alt+N.The Narration form will open up which will allow the user to select what should make up the Narration from the Fields List.The user can also specify the default length for the fields selected
Narration Formula- The user can specify the values of which columns should define the narration.For this click on Narration Formula or Press Alt+N.The Narration form will open up which will allow the user to select what should make up the Narration from the Fields List.The user can also specify the default length for the fields selected
![]() Default For- The user can specify that the configuration which is been created should apply to which form. The following values can be set:
Default For- The user can specify that the configuration which is been created should apply to which form. The following values can be set:
Cash Payments/cash Receipts/Bank Payments/Bank Receipts/Post Dated Cheques.
![]() Default Cash/Bank- Specify the default Cash/Bank. The default Cash is specified in case the configuration is being set for Cash Receipts/Payments and the default Bank is specified in case the configuration is being set for Bank Receipts/Payments.
Default Cash/Bank- Specify the default Cash/Bank. The default Cash is specified in case the configuration is being set for Cash Receipts/Payments and the default Bank is specified in case the configuration is being set for Bank Receipts/Payments.
![]() Default Discount A/C- Specifies the default Discount A/C.
Default Discount A/C- Specifies the default Discount A/C.
![]() Default Bank Chg A/C- Specify the default Bank Charge account.
Default Bank Chg A/C- Specify the default Bank Charge account.
![]() Cost Center Selection- In this option user can set selection of the cost center mandatory or optional in the voucher.
Cost Center Selection- In this option user can set selection of the cost center mandatory or optional in the voucher.
![]() Prompt -ve Cash Balance- This option will prompt a window showing negative balance in the voucher or user can set it Do not Allow Saving which will not allow saving of the voucher in negative cash entry.
Prompt -ve Cash Balance- This option will prompt a window showing negative balance in the voucher or user can set it Do not Allow Saving which will not allow saving of the voucher in negative cash entry.
Other Options-2:
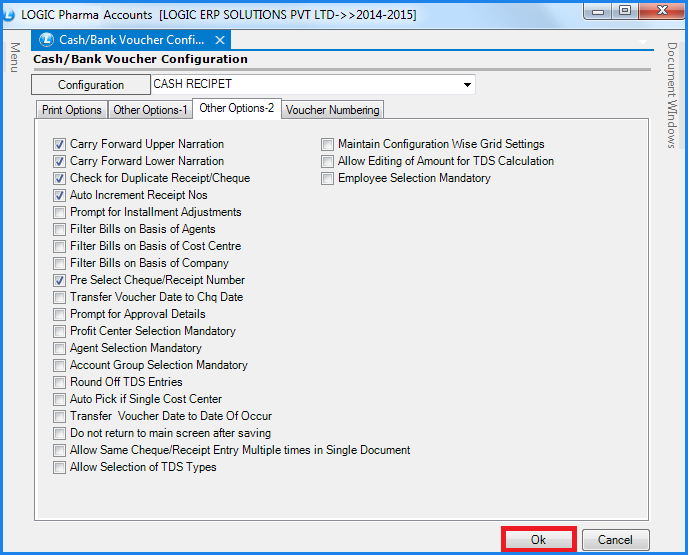
Fig 4. Cash/Bank Voucher Configuration (Other Options-2)
![]() Carry Forward Upper Narration- While entering a voucher for a particular item if the user wants that the same upper narration should apply for the subsequent vouchers then this option needs to be checked in the configuration.
Carry Forward Upper Narration- While entering a voucher for a particular item if the user wants that the same upper narration should apply for the subsequent vouchers then this option needs to be checked in the configuration.
![]() Carry Forward Lower Narration- While entering a voucher for a particular item if the user wants that the same lower narration should apply for the subsequent vouchers then this option needs to be checked in the configuration.
Carry Forward Lower Narration- While entering a voucher for a particular item if the user wants that the same lower narration should apply for the subsequent vouchers then this option needs to be checked in the configuration.
![]() Check For Duplicate Check/Receipts- In order to avoid duplicate Check/Receipts Number select the Check For Duplicate Check/Receipts checkbox. Whenever in a voucher the two receipts have same number and this option is selected then a message box appears saying that duplicate Receipts number exists.
Check For Duplicate Check/Receipts- In order to avoid duplicate Check/Receipts Number select the Check For Duplicate Check/Receipts checkbox. Whenever in a voucher the two receipts have same number and this option is selected then a message box appears saying that duplicate Receipts number exists.
![]() Auto Increment Receipt No- The Receipt Number can be automatically incremented without the user having to enter the Receipt Number every time. For this select the Auto Increment Receipt No. checkbox. In this case the Receipt Number generated will always be unique.
Auto Increment Receipt No- The Receipt Number can be automatically incremented without the user having to enter the Receipt Number every time. For this select the Auto Increment Receipt No. checkbox. In this case the Receipt Number generated will always be unique.
![]() After all the settings have been made for the configuration. Click on OK button or Press Alt+O to save the settings for the configuration.
After all the settings have been made for the configuration. Click on OK button or Press Alt+O to save the settings for the configuration.
Voucher Numbering:
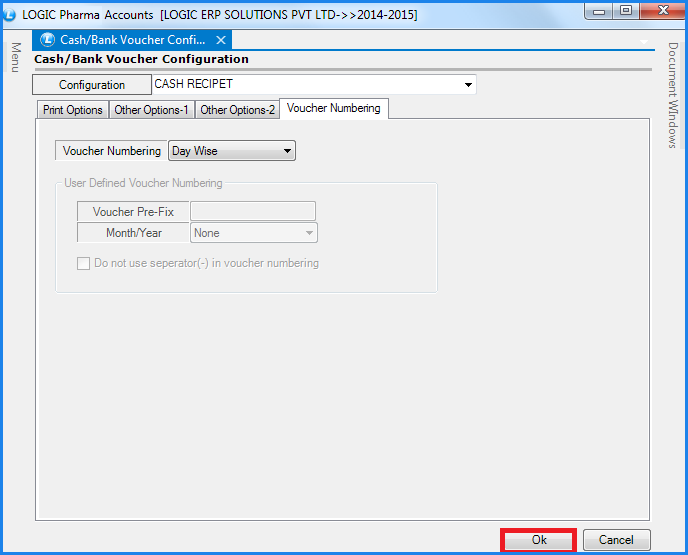
Fig 5. Cash/Bank Voucher Configuration (Voucher Numbering)
![]() Voucher Numbering- This option will allow user to set the voucher number. In User Define voucher number user can set voucher number according to his choice and can set Prefix and format of month and year.
Voucher Numbering- This option will allow user to set the voucher number. In User Define voucher number user can set voucher number according to his choice and can set Prefix and format of month and year.
![]() After all the settings have been made for the configuration Click on OK button or Press Alt+O to save the settings for the configuration
After all the settings have been made for the configuration Click on OK button or Press Alt+O to save the settings for the configuration