![]() The defaults for the Sale/Purchase Journal, Journal Voucher and Credit/Debit Note can be set by using the Journal Voucher Configuration. The configuration lets the user set some defaults like mentioning the columns that should be displayed, the header and footer for the printing etc.
The defaults for the Sale/Purchase Journal, Journal Voucher and Credit/Debit Note can be set by using the Journal Voucher Configuration. The configuration lets the user set some defaults like mentioning the columns that should be displayed, the header and footer for the printing etc.
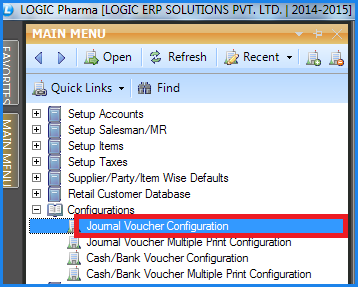
![]() Journal Voucher Configuration : Main Menu> Configuration> Journal Voucher Configuration.
Journal Voucher Configuration : Main Menu> Configuration> Journal Voucher Configuration.
Fig1. Main Menu |
Print Options:
![]() Enter the name of the Configuration in the select box and then set the defaults. If the configuration already exist then select the name of the configuration from the select box and set the defaults for that configuration.
Enter the name of the Configuration in the select box and then set the defaults. If the configuration already exist then select the name of the configuration from the select box and set the defaults for that configuration.
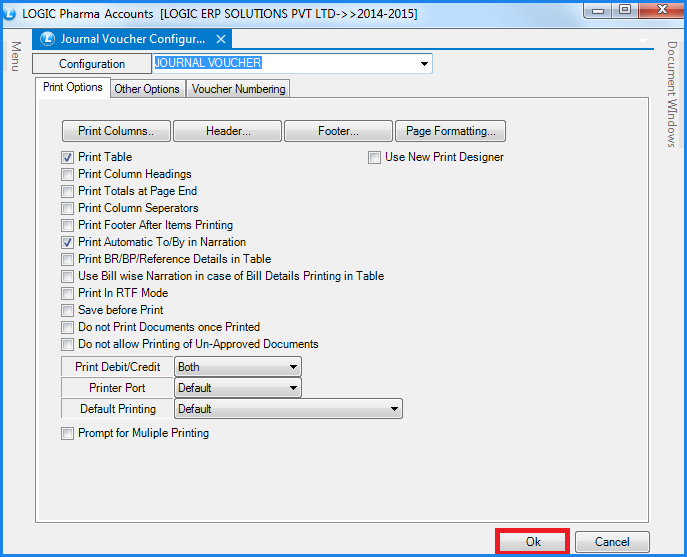
Fig 2. Journal Voucher Configuration (Print Options)
![]() Print Columns: This option allows the user to choose the columns that are required in the printed format of the Journals. For this the user needs to click on Print Columns button or Press Alt+P. The Required Column form will open up and will display the list of the columns that can be printed.
Print Columns: This option allows the user to choose the columns that are required in the printed format of the Journals. For this the user needs to click on Print Columns button or Press Alt+P. The Required Column form will open up and will display the list of the columns that can be printed.
![]() Header- The user can specify what should appear at the top of the Journal. For this click on Header button or Press Alt+H. The Header form will open up which will allow the user to select what should appear in header from the Fields List. The user can also specify the default length for the fields selected.
Header- The user can specify what should appear at the top of the Journal. For this click on Header button or Press Alt+H. The Header form will open up which will allow the user to select what should appear in header from the Fields List. The user can also specify the default length for the fields selected.
![]() Footer- The user can specify what should appear at the bottom of the Journal. For this click on Footer button or Press Alt+F. The Footer form will open up which will allow the user to select what should appear in footer from the Fields List. The user can also specify the default length for the fields selected.
Footer- The user can specify what should appear at the bottom of the Journal. For this click on Footer button or Press Alt+F. The Footer form will open up which will allow the user to select what should appear in footer from the Fields List. The user can also specify the default length for the fields selected.
![]() Page Formatting- The user can set the format of the page for printing i.e. the number of lines that should be printed per page, bottom and top margins, lines in header and footer etc. For this click on Page Formatting button or Press Alt+P. The Page Formatting Form will open up.
Page Formatting- The user can set the format of the page for printing i.e. the number of lines that should be printed per page, bottom and top margins, lines in header and footer etc. For this click on Page Formatting button or Press Alt+P. The Page Formatting Form will open up.
![]() Print Table- In order to print the receipts with all its details the option Print Table should be checked otherwise nothing will be printed
Print Table- In order to print the receipts with all its details the option Print Table should be checked otherwise nothing will be printed
![]() Print Automatic To/By in Narration- A Narration is a short explanation of the nature of the transaction which should always be given before the Journal Entry is closed.The user can choose to add the clause "TO" and "BY" automatically to the narration formula so that it can be known that what exactly was the nature of transaction.For this check the option Print Automatic To/By In Narration.
Print Automatic To/By in Narration- A Narration is a short explanation of the nature of the transaction which should always be given before the Journal Entry is closed.The user can choose to add the clause "TO" and "BY" automatically to the narration formula so that it can be known that what exactly was the nature of transaction.For this check the option Print Automatic To/By In Narration.
Other Options:
![]() Column Locks- Depending upon the user requirements some columns can be locked. The columns which will be locked will not appear in the respective Journal forms and the user will not have to enter their values. For this click on Column Locks button or Press Alt+L. The Column Locks form will open up. Select the fields which should not appear in the respective forms and click on Save button or Press Alt+S to save the settings.
Column Locks- Depending upon the user requirements some columns can be locked. The columns which will be locked will not appear in the respective Journal forms and the user will not have to enter their values. For this click on Column Locks button or Press Alt+L. The Column Locks form will open up. Select the fields which should not appear in the respective forms and click on Save button or Press Alt+S to save the settings.
![]() Narration Formula- The user can specify the values of which columns should define the narration. For this click on Narration Formula or Press Alt+N. The Narration form will open up which will allow the user to select what should make up the Narration from the Fields List. The user can also specify the default length for the fields selected.
Narration Formula- The user can specify the values of which columns should define the narration. For this click on Narration Formula or Press Alt+N. The Narration form will open up which will allow the user to select what should make up the Narration from the Fields List. The user can also specify the default length for the fields selected.
![]() Default Day Book- The user can specify that the configuration which is been created should apply to which Day Book. The following values can be set :-
Default Day Book- The user can specify that the configuration which is been created should apply to which Day Book. The following values can be set :-
SL->SALE, SR->Sale Return, PU->Purchase, PR- >Purchase Return, CN->Credit Note, DN->Debit Note, JV- >Journal.
![]() Bill No As- The format for the Bill No. can be set.It could either be the combination of Document Series+Number or just the Document Number.
Bill No As- The format for the Bill No. can be set.It could either be the combination of Document Series+Number or just the Document Number.
![]() Move Voucher Date To Bill Date- The user can set the Bill Date equal to Voucher Date.For this the option Move Voucher Date To Bill Date has to be checked.
Move Voucher Date To Bill Date- The user can set the Bill Date equal to Voucher Date.For this the option Move Voucher Date To Bill Date has to be checked.
![]() Create Due Date from Payment Terms- The Due Date can be set by adding the No. of Days (the No. Of Days that are defined for a account in Payment Terms using the Setup New Account form)to the Date.For this the option Create Due Date from Payment Terms has to be checked.
Create Due Date from Payment Terms- The Due Date can be set by adding the No. of Days (the No. Of Days that are defined for a account in Payment Terms using the Setup New Account form)to the Date.For this the option Create Due Date from Payment Terms has to be checked.
![]() Carry Forward Debit/Credit- While entering a voucher for a particular party if the user wants that the same Debit/Credit should apply for the subsequent items then this option needs to be checked in the configuration.
Carry Forward Debit/Credit- While entering a voucher for a particular party if the user wants that the same Debit/Credit should apply for the subsequent items then this option needs to be checked in the configuration.
![]() Pick Agent From Agent+Party Linking- This option will allow the selection of the agent according to the Salesman + Party Linking form.
Pick Agent From Agent+Party Linking- This option will allow the selection of the agent according to the Salesman + Party Linking form.
![]() Profit Center Selection Mandatory- This option will allow user to mandatory select profit center in the voucher.
Profit Center Selection Mandatory- This option will allow user to mandatory select profit center in the voucher.
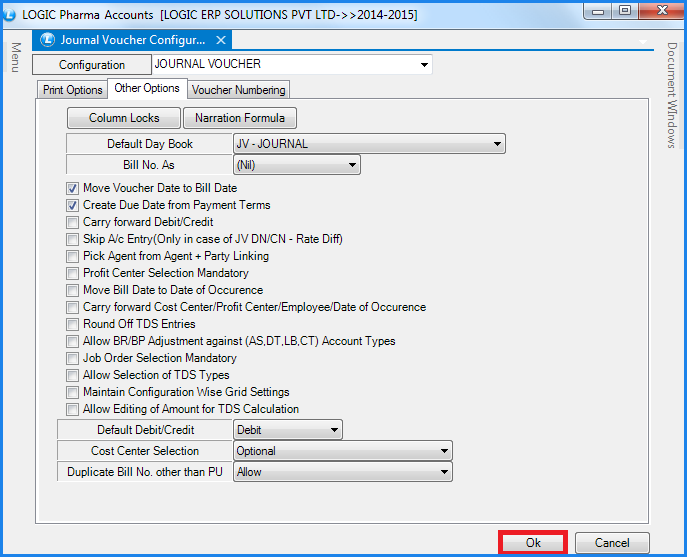
Fig 3. Journal Voucher Configuration (Other Options)
Voucher Numbering:
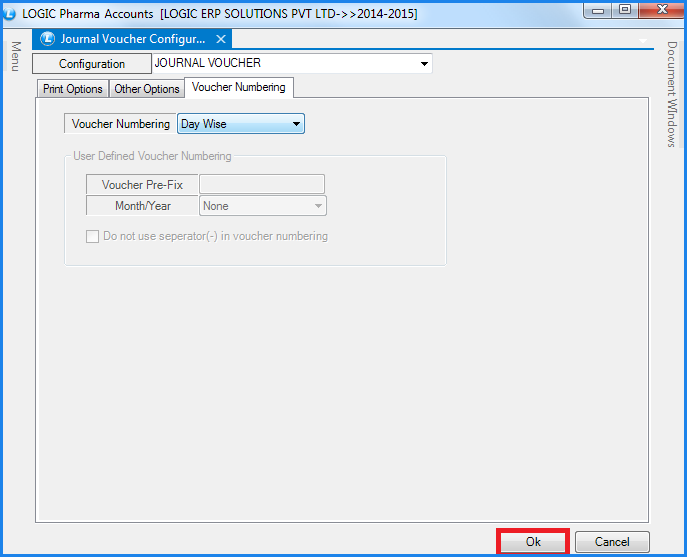
Fig 4. Journal Voucher Configuration (Voucher Numbering)
![]() Voucher Numbering- This option will allow user to set the voucher number. In User Define voucher number user can set voucher number according to his choice and can set Prefix and format of month and year.
Voucher Numbering- This option will allow user to set the voucher number. In User Define voucher number user can set voucher number according to his choice and can set Prefix and format of month and year.
![]() After all the settings have been made for the configuration Click on OK button or Press Alt+O to save the settings for the configuration.
After all the settings have been made for the configuration Click on OK button or Press Alt+O to save the settings for the configuration.