|
 Sale Invoice (Retail) involves the same billing details like Sale Bill and other optional details for patient details like their Series, Date No., OPD No., Mode of payments, Date of billing etc. Sale Invoice (Retail) involves the same billing details like Sale Bill and other optional details for patient details like their Series, Date No., OPD No., Mode of payments, Date of billing etc.
Sale Invoice (Retail) affects both inventory and accounts. The stock is likely to be affected by the medicines given and cash flow will increase depending upon the number of patients & other related factors to their condition.
Sale Invoice (Retail) : Main Menu > Sale > Sale Bill
 Main Menu Main Menu
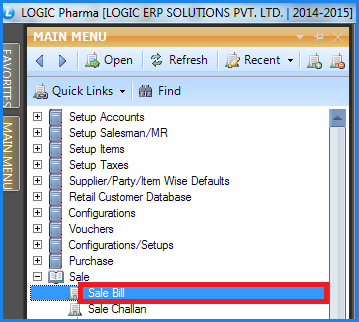
FIG 1. Main Menu
|
Contents:
 Header Details Header Details
Item Details
Series : Specify the Bill Series which is the combination of the Series and the Number (the Series and the Number that have been specified for that Series in the Setup Bill Series form). The configuration that has been specified for the series selected will be applied to the Sale Bill.
Date And No- Specify the Date and the Number for the bill.
Payment Mode- The Payment Mode can be set to either Cash, Cheque or Credit.
Cash- If the payment mode is set to Cash and the user does not specify the customer name then the Cash Customer button is activated. The Setup Cash Bill Customers form will open up in which the user can specify customer name, patient details, tax region. The user can also specify the maximum number of rows in the grid. Clicking on OK button will save the record and the customer name specified will be displayed in the text box. The user can skip entering other details but customer name will have to be specified.
Cheque- Cheque- If the Payment Mode is set to Cheque then the Cheque details button will be activated. Clicking on the Cheque Details button will open up the Cheque Details form. Specify the Cheque No, Cheque Date, Bank Name, Branch, Account No, Customer Name and Address. Clicking on OK button will save the details. The user can skip entering other details but Cheque No. will have to be specified.
Account / Customer Name- Press the space bar and select the account or party name to whom goods have to be delivered. The Accounts that have been created using the Account\Ledger Creation form.
Account Search Window
Account/ Party Search List
|
Press the space bar and select the account or party name to whom goods have to be delivered and the below given window will appear. The options highlighted in the picture are explained below in the table.

ACCOUNT SEARCH LIST
|
Ledger Report of Party (F3)
|
If User wants to view the ledger report of the selected party then select party then select the option "Show Ledger after Account Selection" or click on the button "Zoom To Ledger F3"

MONTH WISE LEDGER
|
Dues Report of Party (F4)
|
If User wants to view the dues report of the selected party then select the option "Show Dues After Account Selection" or click on the button "Zoom to F4"

DUES REPORT
|
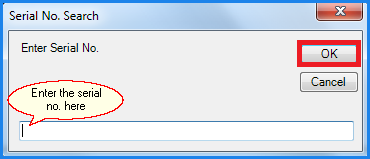
Search By Serial No (F5)
|
If User wants to search the party with the serial number then press F5-Search on Serial Number

Serial No. Search
|
Edit By Account Details (F6)
|
If User wants to edit account details of the party then press function Key-F6, below given pop up will come where user can do the required changes and then press Save button to save the changes made by the user.

Edit Account Details
|
New Account (F2)
|
If User wants to create new account, then press the function Key-F2 and the Account/Ledger Creation form will open up where user can add new account.
|
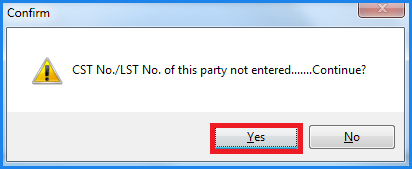
Prompt If Blank
|
In Prompt if Blank, three possible options are there DL No., CST NO., TIN No. and if user selects any of the option and at the time of creating party this option is not filled or left blank by the user then it will prompt a message.
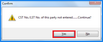
Confirmation Box
|
|
Tax Region- Select the tax region for the party from the list. Tax selected here will be applied on the entire challan.
Agent Name- Enter the agent name if you want to assign any salesman to the party. The Agent/Salesman that have been created using the Setup Salesman form.
Price List- Click this button to select different price list.
Header Details:
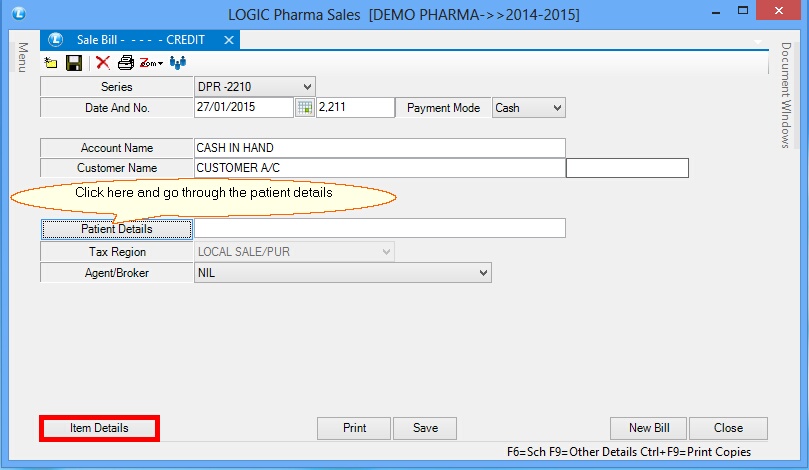
Fig 2. Sale Bill (Header Details)
After clicking on Patient Details another window will open with all the patient details where you can click on the space for Patient Name and go through the information provided against every name.
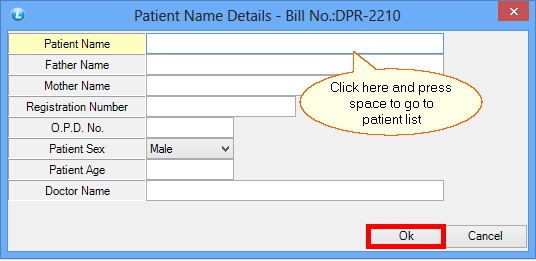
FIG 3. Patient Name Details
The window given below shows the list of existing customers and their details. There are three shortcuts that have been highlighted by red show you additional options in the patient search list. F2 gives you the option to add a new customer and his/her details. F3 allows you to edit the record of existing customers. F5 will allow you to have a view of all the transactions happening with a customer.
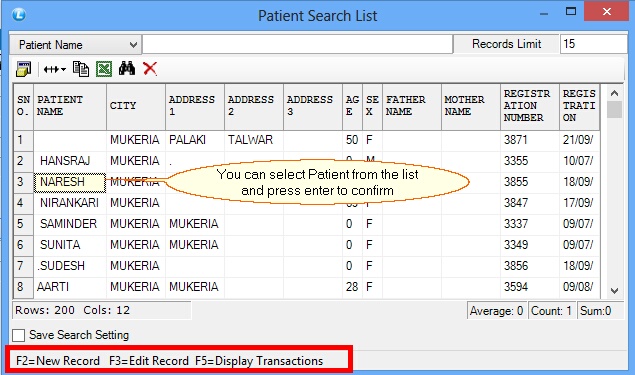
FIG 3. Patient Search List
This is the final sale bill for the patient you selected from the patient list.
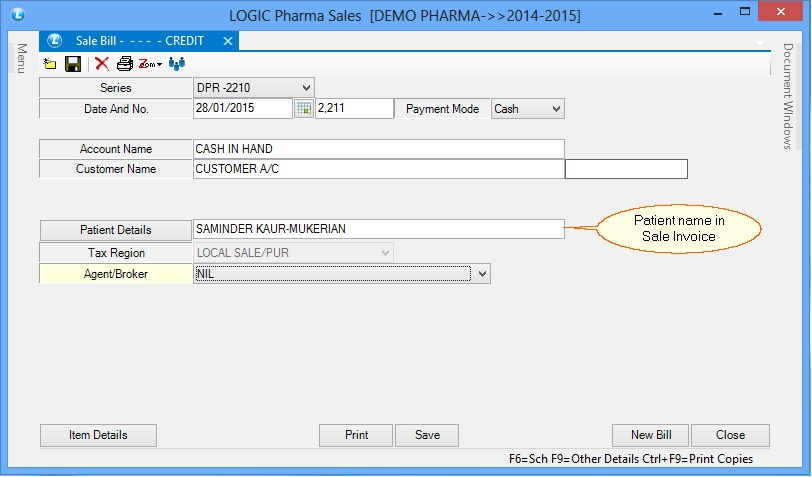
FIG 4. Edit Patient Details
Item Details
The Item Details in Sale Bill will appear and then enter the following details
Enter all the required item details.
[****]Item Search Window
Item Search List
|
Press the Space bar in Item Name Column and select the required item name from the list, after pressing space bar below given window will appear. The options highlighted in the picture are explained below in the table

Item Search List
|
New Item (F2)
|
If user wants to create new item with multiple pack sizes then press the Function Key- F2 and the Item With Multiple Pack/Size form will open where user can add new items.
|
New Item (F3)
|
If user wants to create new item with multiple shades and company then press the Function Key- F2 and the Item With Multiple Pack/Size form will open where user can add new items.
|
Stock Details (F5)
|
If user wants to view the stock details of the required items then select the item and press F5 where user can see the current stock, godown and rate of that item.

Item Wise Stock
|
Toggle Search (F9)
|
If user wants to toggle the item search then press F9 and user can set the search criteria, the possible options which can be set by the user are-Item Name, Item Description, Item Model, Item Part.

Toggle Search
|
|
[****]Lot Search Window
Lot Search List
|
Press the space bar in Lot Number Column and select the required lot from the list, after pressing space bar below given window will appear. The options highlighted in the picture are explained below in the table.
Lot Search List
|
Item's Txn's (F2)
|
To view the item wise transaction, Press the function key-F2 and below given window will appear where the bill wise details of the item will be shown.

Item Wise Transactions
|
Lot Txn's (F3)
|
To view the lot wise transaction, Press the function key-F3 and below given window will appear where the bill wise details of the item and its lot will be shown.

Party/Item Wise Transactions
|
New Lot (F4)
|
If user wants to create new lot for an item then press the function key-F4 and then below given window will open where user can add new lots for the selected item.

New Lot
|
Edit Lot (F5)
|
If user wants to edit lot details of an item then press function key-F5, below given window will come where user can do the required changes and then press Save the button to save the changes made by the user.

Edit Lot Details
|
Configuration (F9)
|
If user wants to make any change in the lot configuration then press the function key-F9 to view the Lot search Configuration window.

Lot Configuration
|
|
After you confirmed the patient with all it's details then after that the items sale for that particular patient is entered and move forward to making the bill for the patient.
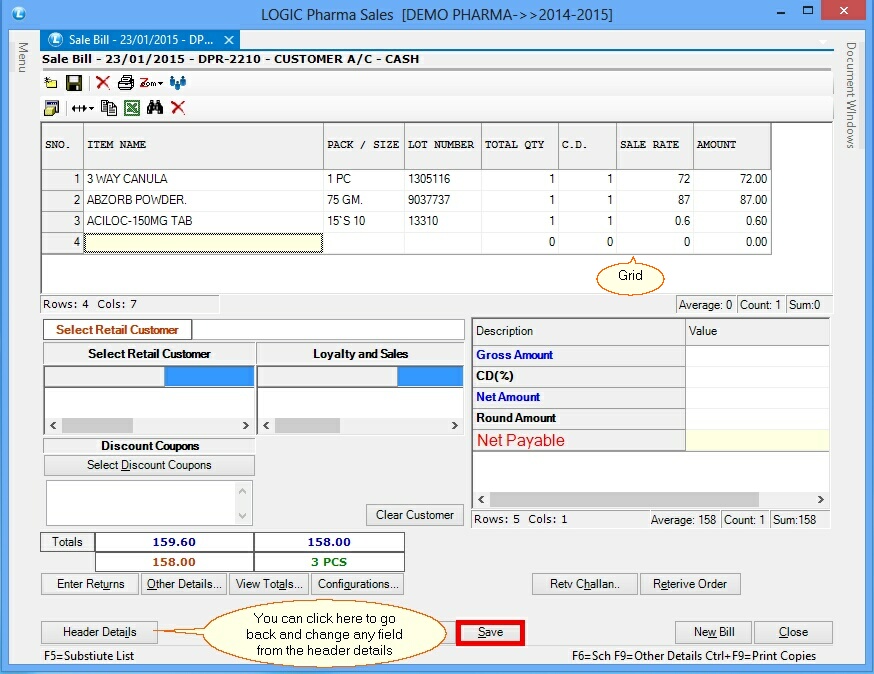
Fig 3. Sale Bill (Item Details

|
To save the data entered by the user, user have to press enter button and the cursor should be on next line in the grid.
|
View Total

FIG 5. Bill Total
|
Hot Keys
| ◆ | Press F1 to view the function of all hot keys in the sale challan, below given screen will appear. |
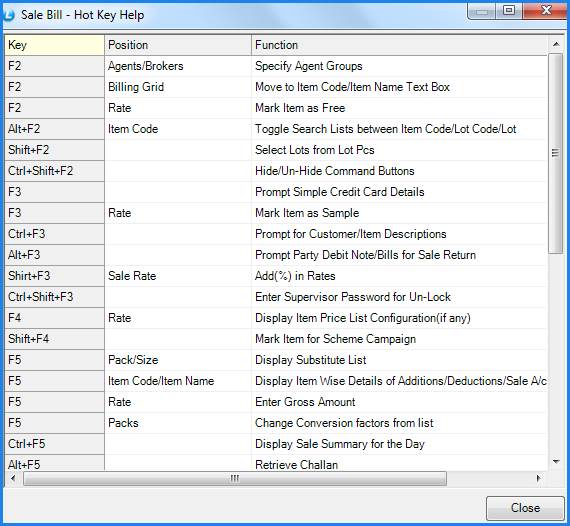
FIG 6. Hot Keys
|
Back To Top
|