|
Print Options |
  
|
|
Print Options |
|
To set the defaults for printing click on Print Options Tab.
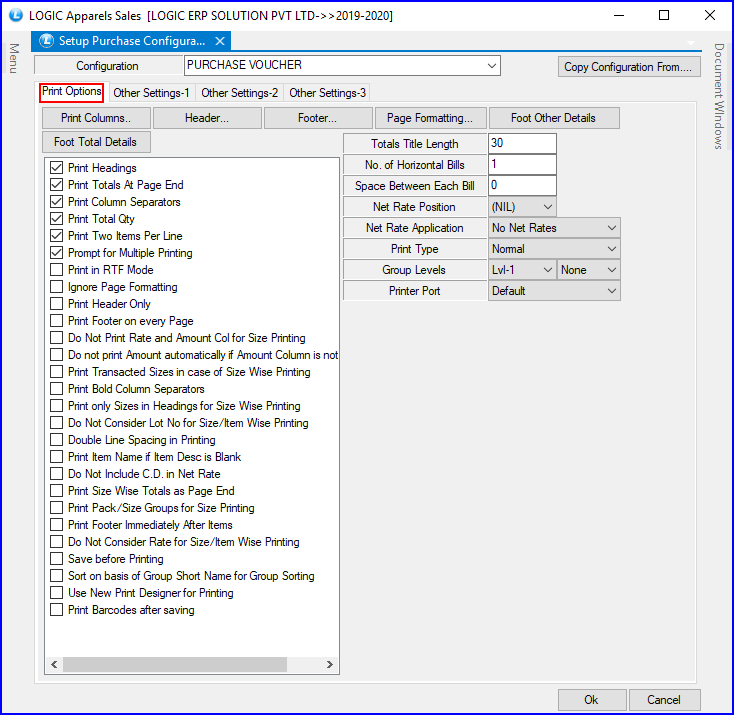
Fig 1. Purchase Voucher Configurations (Print Options)
The Print Options let the user set the following defaults:
![]() Print Columns- This option allows the user to choose the columns that are required in the printed format of the Purchase Voucher. For this the user needs to click on Print Columns button or Press Alt+P. The Print Columns form will open up and will display the list of the columns that can be printed.
Print Columns- This option allows the user to choose the columns that are required in the printed format of the Purchase Voucher. For this the user needs to click on Print Columns button or Press Alt+P. The Print Columns form will open up and will display the list of the columns that can be printed.
![]() Header- The user can specify what should appear at the top of the Purchase Voucher. For this click on Header button or Press Alt+H. The Header form will open up which will allow the user to select what should appear in header from the Fields List. The user can also specify the default length for the fields selected.
Header- The user can specify what should appear at the top of the Purchase Voucher. For this click on Header button or Press Alt+H. The Header form will open up which will allow the user to select what should appear in header from the Fields List. The user can also specify the default length for the fields selected.
![]() Footer- The user can specify what should appear at the bottom of the Purchase Voucher. For this click on Footer button or Press Alt+F. The Footer form will open up which will allow the user to select what should appear in footer from the Fields List. The user can also specify the default length for the fields selected.
Footer- The user can specify what should appear at the bottom of the Purchase Voucher. For this click on Footer button or Press Alt+F. The Footer form will open up which will allow the user to select what should appear in footer from the Fields List. The user can also specify the default length for the fields selected.
![]() Page Formatting- The user can set the format of the page for printing i.e. the number of lines that should be printed per page, bottom and top margins, lines in header and footer etc. For this click on Page Formatting button or Press Alt+P. The Page Formatting form will open up.
Page Formatting- The user can set the format of the page for printing i.e. the number of lines that should be printed per page, bottom and top margins, lines in header and footer etc. For this click on Page Formatting button or Press Alt+P. The Page Formatting form will open up.
![]() Foot Other Details- Clicking on this button will open up a Foot Other Details form which will display the list of the fields that can be printed at the end of the voucher. Select the fields whose values need to be printed and click on Ok button.
Foot Other Details- Clicking on this button will open up a Foot Other Details form which will display the list of the fields that can be printed at the end of the voucher. Select the fields whose values need to be printed and click on Ok button.
|
The fields and their values will be printed only if the option Print Totals at Page End is selected. |
![]() Foot Total Details- Clicking on this button will open up a Foot Other Details form in which a user can specify the name of the columns that should be printed at the footer along with the totals. Clicking on the Foot Total Details button will open up a form which will enable the user to select the field and specify the name of the field. The user can specify this according to the Tax Region. Select the tax region and specify the column name. Click on Ok button to save the changes.
Foot Total Details- Clicking on this button will open up a Foot Other Details form in which a user can specify the name of the columns that should be printed at the footer along with the totals. Clicking on the Foot Total Details button will open up a form which will enable the user to select the field and specify the name of the field. The user can specify this according to the Tax Region. Select the tax region and specify the column name. Click on Ok button to save the changes.
![]() Print Headings- Checking this option will print the column headings. If the option is not checked then the values of the columns will be printed but the column names/headings will not be printed.
Print Headings- Checking this option will print the column headings. If the option is not checked then the values of the columns will be printed but the column names/headings will not be printed.
![]() Print Totals At Page End- At the time of printing if user want to print the totals at the end of every page select the option Print Totals At Page End .
Print Totals At Page End- At the time of printing if user want to print the totals at the end of every page select the option Print Totals At Page End .
![]() Print Column Separators- To demarcate each column value select the option Print Column Separators. If this option is not selected then the column values will be printed but the the user will not be able to demarcate the values properly.
Print Column Separators- To demarcate each column value select the option Print Column Separators. If this option is not selected then the column values will be printed but the the user will not be able to demarcate the values properly.
![]() Print Total Qty- To print the total quantity of the items that make up a voucher select the option Print Total Qty. If the option is not selected then the total quantity will not be printed.
Print Total Qty- To print the total quantity of the items that make up a voucher select the option Print Total Qty. If the option is not selected then the total quantity will not be printed.
![]() Print Two Items Per Line- In case of plain stationary if the single voucher has large number of items and the user wants to get the print in one page then selecting the option will print the voucher in such a way that after certain number of items are printed then the remaining will be printed in the same page horizontally. This option has to be selected in case of Plain stationary.
Print Two Items Per Line- In case of plain stationary if the single voucher has large number of items and the user wants to get the print in one page then selecting the option will print the voucher in such a way that after certain number of items are printed then the remaining will be printed in the same page horizontally. This option has to be selected in case of Plain stationary.
![]() Prompt For Multiple Printing- A user may have Pre Print stationary or the Plain stationary and sometimes both. If the user has the Pre Print stationary and Plain stationary then selecting this option will prompt the user to specify which stationary should be printed when printing the Purchase Voucher. The two options are displayed when printing Purchase Voucher. One is Default Printing which is for Plain stationary and the other is Print Purchase Voucher which is for Pre Print stationary.
Prompt For Multiple Printing- A user may have Pre Print stationary or the Plain stationary and sometimes both. If the user has the Pre Print stationary and Plain stationary then selecting this option will prompt the user to specify which stationary should be printed when printing the Purchase Voucher. The two options are displayed when printing Purchase Voucher. One is Default Printing which is for Plain stationary and the other is Print Purchase Voucher which is for Pre Print stationary.
![]() Print In RTF Mode- This option needs to be selected if the printer used is either the Laser printer or Ink Jet. In case this option is not selected then the voucher will not be printed according to the settings made.
Print In RTF Mode- This option needs to be selected if the printer used is either the Laser printer or Ink Jet. In case this option is not selected then the voucher will not be printed according to the settings made.
![]() Ignore Page Formatting- Checking this option will ignore the settings for Page if it has been set using the Page Formatting option.
Ignore Page Formatting- Checking this option will ignore the settings for Page if it has been set using the Page Formatting option.
![]() Print Header Only- A header is printed in the top margin of the bill. At the time of printing if user wants to print header part then selecting this option will allow user to print header part only in the bill.
Print Header Only- A header is printed in the top margin of the bill. At the time of printing if user wants to print header part then selecting this option will allow user to print header part only in the bill.
![]() Print Footer On Every Page- A footer is printed in the bottom margin of the bill. This option will allow user to print footer part on every page of the bill while printing.
Print Footer On Every Page- A footer is printed in the bottom margin of the bill. This option will allow user to print footer part on every page of the bill while printing.
![]() Do Not Print Rate And Amount Col For Size Wise Printing- If the Print Type is selected as Size Wise Printing then at the time of printing of bill it will not show rate and amount columns of the items.
Do Not Print Rate And Amount Col For Size Wise Printing- If the Print Type is selected as Size Wise Printing then at the time of printing of bill it will not show rate and amount columns of the items.
![]() Do Not Print Amount Automatically If Amount Col Is Not Selected- This option will not allow user to print amount automatically in the bill at the time of printing.
Do Not Print Amount Automatically If Amount Col Is Not Selected- This option will not allow user to print amount automatically in the bill at the time of printing.
![]() Print Transacted Sizes In Size Wise Printing- Not selecting this option allows user to see items with different sizes in the bill and if user check this option then it will show the consolidated view of items that is it will combine all the pack/sizes in one row.
Print Transacted Sizes In Size Wise Printing- Not selecting this option allows user to see items with different sizes in the bill and if user check this option then it will show the consolidated view of items that is it will combine all the pack/sizes in one row.
![]() Print Bold Column Separators- This option allows the user to print bold column separators after every other column.
Print Bold Column Separators- This option allows the user to print bold column separators after every other column.
![]() Print Only Sizes In Headings For Size Wise Printing- Selecting this option allows the user to print item's different sizes in the headings at the time of printing of bill.
Print Only Sizes In Headings For Size Wise Printing- Selecting this option allows the user to print item's different sizes in the headings at the time of printing of bill.
![]() Do Not Consider Lot No For Size/Item Wise Printing- Selecting this option allows to combine all the lots of the items in one row but only when the Print Type is selected as Size Wise Printing and Item Wise Printing.
Do Not Consider Lot No For Size/Item Wise Printing- Selecting this option allows to combine all the lots of the items in one row but only when the Print Type is selected as Size Wise Printing and Item Wise Printing.
![]() Double Line Spacing In Printing- Selecting this option will allow double line spacing after every item in printing.
Double Line Spacing In Printing- Selecting this option will allow double line spacing after every item in printing.
![]() Print Item Name If Item Desc Is Blank- If the item description is blank then at the time of printing it will print item name in the place of the item description.
Print Item Name If Item Desc Is Blank- If the item description is blank then at the time of printing it will print item name in the place of the item description.
![]() Do Not Include C.D In Net Rate- Selecting this option will not allow to include Cash Discount in the net rate of the bill.
Do Not Include C.D In Net Rate- Selecting this option will not allow to include Cash Discount in the net rate of the bill.
![]() Print Size Wise Totals As Page End- Selecting this option will allow user to print size wise totals at the end of the bill while printing.
Print Size Wise Totals As Page End- Selecting this option will allow user to print size wise totals at the end of the bill while printing.
![]() Print Pack/Size Groups For Size Printing- When the print type is set as Size Wise Printing then selecting this option will allow user to print pack/size of the items in a group.
Print Pack/Size Groups For Size Printing- When the print type is set as Size Wise Printing then selecting this option will allow user to print pack/size of the items in a group.
![]() Print Footer Immediately After Items- Selecting this option allows user to select footer immediately after the items.
Print Footer Immediately After Items- Selecting this option allows user to select footer immediately after the items.
![]() Do Not Consider Rate For Size/Item Wise Printing- Selecting this option will allow user not to show rate of the items at the time of printing of bill.
Do Not Consider Rate For Size/Item Wise Printing- Selecting this option will allow user not to show rate of the items at the time of printing of bill.
![]() Save Before Printing- Selecting this option will allow user to save the bill before printing.
Save Before Printing- Selecting this option will allow user to save the bill before printing.
![]() Sort On Basis Of Group Short Name For Group Sorting- Selecting this option will allow user to do the sorting on the basis of group's short name rather then the group's name.
Sort On Basis Of Group Short Name For Group Sorting- Selecting this option will allow user to do the sorting on the basis of group's short name rather then the group's name.
![]() Use New Print Designer For Printing- Selecting this option will allow user to see the printing in Dot Net version.
Use New Print Designer For Printing- Selecting this option will allow user to see the printing in Dot Net version.
The other defaults that can be set for printing are:

Fig 2. Print Settings
![]() Total Titles Length- The user can specify the default length for the title.For this enter a numeric value in the text field for the length of the title.
Total Titles Length- The user can specify the default length for the title.For this enter a numeric value in the text field for the length of the title.
![]() No Of Horizontal Bills- The user can specify the amount of horizontal bills by entering the numeric value in the text field.
No Of Horizontal Bills- The user can specify the amount of horizontal bills by entering the numeric value in the text field.
![]() Space Between Each Bill- The user can specify the space between each bill by entering the numeric value to define the space size in the text field.
Space Between Each Bill- The user can specify the space between each bill by entering the numeric value to define the space size in the text field.
![]() Net Rate Position- The Net Rate that will be printed can either be the Net Rate after the tax has been charged or it can be either after the various CD,T.D or Schemes have been calculated.To specify after which calculations the Net Rate should be printed specify the position from the Net Rate Position combo box.
Net Rate Position- The Net Rate that will be printed can either be the Net Rate after the tax has been charged or it can be either after the various CD,T.D or Schemes have been calculated.To specify after which calculations the Net Rate should be printed specify the position from the Net Rate Position combo box.
![]() Net Rate Application- The Net Rate that will be printed can either be the actual Net Rate or it can be one of the following :
Net Rate Application- The Net Rate that will be printed can either be the actual Net Rate or it can be one of the following :
Tax Paid=Net Rate
Taxable=Net Rate
Taxfree=Net Rate
All Net Rates
![]() Print Type- The user can choose to get the print of the Purchase Voucher according to their requirements.The possible options are- Normal/Size Wise/Size+Rate Wise/Item Wise.
Print Type- The user can choose to get the print of the Purchase Voucher according to their requirements.The possible options are- Normal/Size Wise/Size+Rate Wise/Item Wise.
![]() If the option Normal is selected then whatever columns have been selected and the other settings which have been made the Purchase Voucher will be printed in that format.
If the option Normal is selected then whatever columns have been selected and the other settings which have been made the Purchase Voucher will be printed in that format.
![]() If the option Size Wise is selected then Header and the Footer will remain same and the sizes of that items will be printed horizontally with the Quantity under each size.
If the option Size Wise is selected then Header and the Footer will remain same and the sizes of that items will be printed horizontally with the Quantity under each size.
![]() If the option Size+Rate Wise is selected then the Header and Footer will remain same and the sizes of that items will be printed horizontally with the Rate and Quantity printed vertically under each size of that item.
If the option Size+Rate Wise is selected then the Header and Footer will remain same and the sizes of that items will be printed horizontally with the Rate and Quantity printed vertically under each size of that item.
![]() If the option Item Wise is selected then the sizes of that item will not be printed.
If the option Item Wise is selected then the sizes of that item will not be printed.
![]() Group Levels- The user can define the Group and sub-group levels.
Group Levels- The user can define the Group and sub-group levels.
![]() Printer Port- The user can define the Printer Port type in case the user wants to print the Bill.
Printer Port- The user can define the Printer Port type in case the user wants to print the Bill.