|
Item With Multiple Pack/Size |
  
|
| Show/Hide Hidden Text |
|
Item With Multiple Pack/Size |
|
| Show/Hide Hidden Text |
![]() If an Item exist with different Pack/Sizes then the user can enter the different Pack/Size details of the Item using this form.
If an Item exist with different Pack/Sizes then the user can enter the different Pack/Size details of the Item using this form.
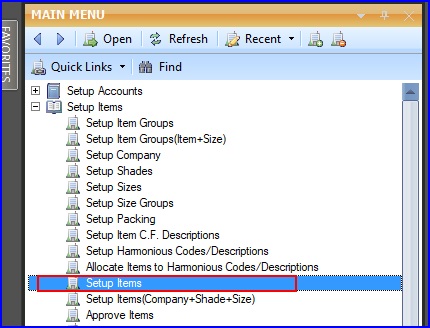
![]() Item with multiple Pack/Size: Main Menu > Setup Items > Setup Items.
Item with multiple Pack/Size: Main Menu > Setup Items > Setup Items.
Fig 1. Main Menu |
![]() Creating Items (Header Details)
Creating Items (Header Details)
![]() Creating Items (Group Details)
Creating Items (Group Details)
![]() Creating Items (Pack/Size Details)
Creating Items (Pack/Size Details)
Creating New Item
In order to create a new item click on New Item button or press Alt+W. The form contains three main parts : Header Details, Company and Pack / Sizes, Shades and Groups.
This section contains the details related to the items which is given below:
![]() Item Name: Enter the Item Name manually, it is a mandatory column can't be left blank.
Item Name: Enter the Item Name manually, it is a mandatory column can't be left blank.
![]() Item Description (Alt+I): In order to enter the item description click the button or press Alt+I > Item Description dialog box appears > enter the description in the text area and click ok or press Alt+O. It is an optional column.
Item Description (Alt+I): In order to enter the item description click the button or press Alt+I > Item Description dialog box appears > enter the description in the text area and click ok or press Alt+O. It is an optional column.
![]() Image: If user want to link the picture with Item then click on the Image button > Item Image dialog box appears > select the style from the list and provide the path of the picture > click ok or press Alt+O. It is an optional column.
Image: If user want to link the picture with Item then click on the Image button > Item Image dialog box appears > select the style from the list and provide the path of the picture > click ok or press Alt+O. It is an optional column.
![]() Company Name: Select the Company Name from the list. It is an optional column.
Company Name: Select the Company Name from the list. It is an optional column.
![]() Godown Name: Select the Godown Name from the list. It is an optional column.
Godown Name: Select the Godown Name from the list. It is an optional column.
![]() Shade Name: To select the shade for the item press the space bar > Shade Search List dialog box appears > select the required shade and press enter. It is an optional column.
Shade Name: To select the shade for the item press the space bar > Shade Search List dialog box appears > select the required shade and press enter. It is an optional column.
![]() Size Diff (Rs): It is the difference in the rates according to the size of the Items.
Size Diff (Rs): It is the difference in the rates according to the size of the Items.
![]() Finished/Raw: Select the type from the list.It is an optional column.
Finished/Raw: Select the type from the list.It is an optional column.
![]() Taxes For Sale: Assign the sale tax for the Item from the list.It is an optional column.
Taxes For Sale: Assign the sale tax for the Item from the list.It is an optional column.
![]() Taxes For Purchase: Assign the purchase tax for the Item from the list. It is an optional column.
Taxes For Purchase: Assign the purchase tax for the Item from the list. It is an optional column.
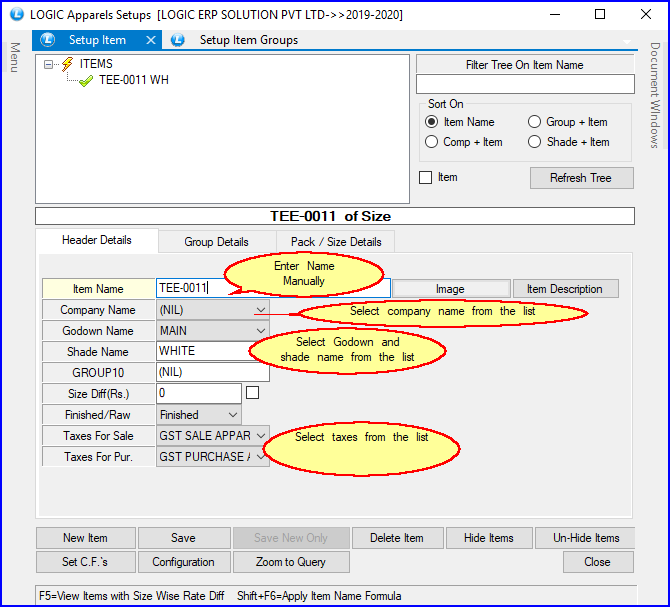
Fig 2. Header Details
![]() In this section the item is assigned to the group. There are total 9 groups, select any one group from these groups under which you want to allocate the item.
In this section the item is assigned to the group. There are total 9 groups, select any one group from these groups under which you want to allocate the item.
![]() Select the Group press the space bar > Item Group Search List dialog box appears, select the group name and press Enter.
Select the Group press the space bar > Item Group Search List dialog box appears, select the group name and press Enter.
![]() HS Code: It is the Harmonious Serial number of the item. To assign HS code press the space bar > Harmonious Search list dialog box > select the required code and press Enter. It is an optional column.
HS Code: It is the Harmonious Serial number of the item. To assign HS code press the space bar > Harmonious Search list dialog box > select the required code and press Enter. It is an optional column.
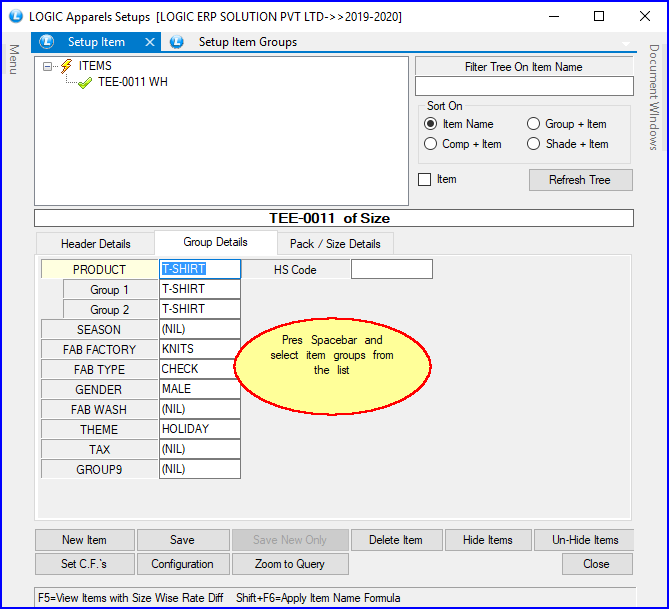
Fig 3. Group Details
In this section the pack and size details are provided to the item.For this click the Pack/Sizes tab or press Alt+K.
![]() Pack Name: To assign the pack name to the item press the space bar > Pack/Search List dialog box appears > select the pack from the existing packs or user can also crate a new pack > press Enter.
Pack Name: To assign the pack name to the item press the space bar > Pack/Search List dialog box appears > select the pack from the existing packs or user can also crate a new pack > press Enter.
|
User can not assign Item Code if the Pack Name is not assigned. |
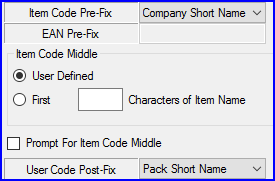
![]() Do Not Print Bar Code: If you want to print the barcode of the Item then check the box else remained unchecked. This can also be done in the Configuration. Click the Configuration button or press Alt+F check the Do not Print The Bar Code as shown in fig.
Do Not Print Bar Code: If you want to print the barcode of the Item then check the box else remained unchecked. This can also be done in the Configuration. Click the Configuration button or press Alt+F check the Do not Print The Bar Code as shown in fig.
Fig 4. Configuration
|
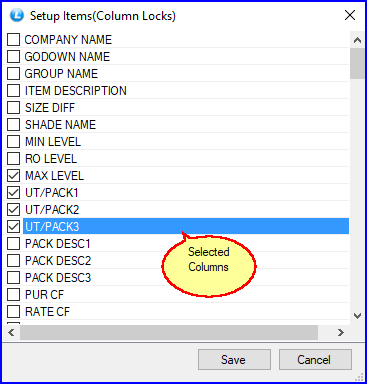
![]() Additional (Add) Item Code: Enter the Additional item codes if required. The additional item code column can be locked to enter additional item code. To lock the column click the Configuration button or press Alt+F > click on Column Locks button > check the Additional IT code box and click on Save button or press Alt+S. It is an optional column.
Additional (Add) Item Code: Enter the Additional item codes if required. The additional item code column can be locked to enter additional item code. To lock the column click the Configuration button or press Alt+F > click on Column Locks button > check the Additional IT code box and click on Save button or press Alt+S. It is an optional column.
![]() Item Rates (Alt+R): This tab contains the different rates related to the item as shown in the figure. These are the optional values can be left blank. By default Zero value is assigned to the rates.
Item Rates (Alt+R): This tab contains the different rates related to the item as shown in the figure. These are the optional values can be left blank. By default Zero value is assigned to the rates.
![]() After entering all the detail related to the item click on Save button or press Alt+S to save the new item.
After entering all the detail related to the item click on Save button or press Alt+S to save the new item.
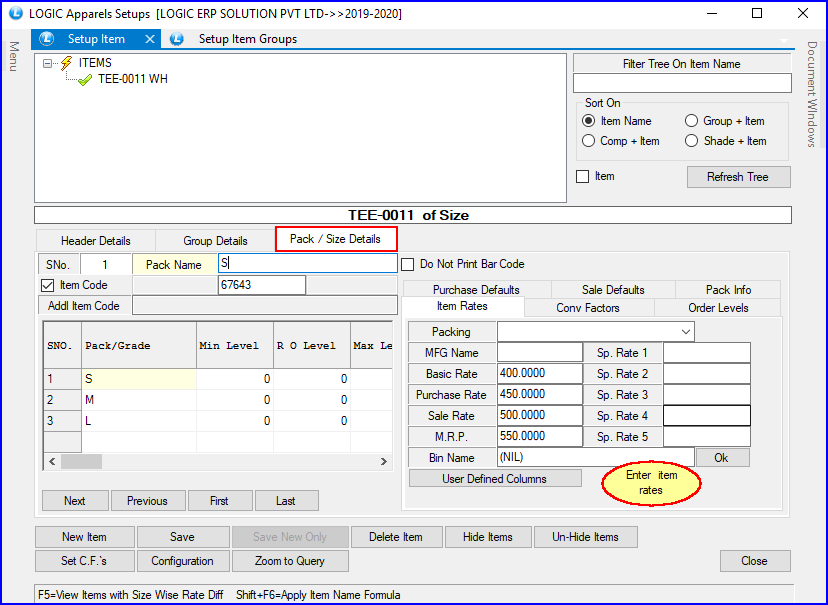
Fig 5. Pack/Size Details
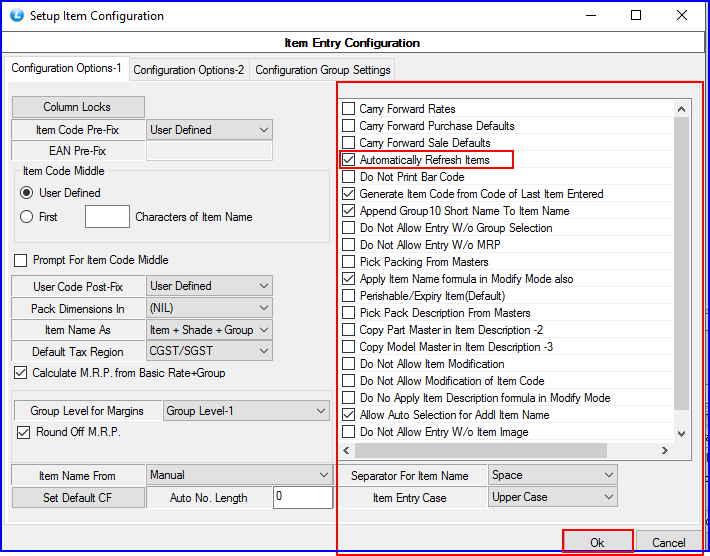
It is used to set the various kinds of configuration. Click the button or press Alt+F > Item Entry Configuration dialog box appears.
![]() Carry Forward Rates: Check the box if you want to see the previous rates in the next record.
Carry Forward Rates: Check the box if you want to see the previous rates in the next record.
![]() Carry Forward Purchase Defaults: Check the box if you want to see the previous Purchase Defaults in the next record.
Carry Forward Purchase Defaults: Check the box if you want to see the previous Purchase Defaults in the next record.
![]() Carry Forward Sale Defaults: Check the box if you want to see the previous Sale Defaults in the next record.
Carry Forward Sale Defaults: Check the box if you want to see the previous Sale Defaults in the next record.
![]() Do Not Allow Entry W/o Group Selection: Check the box if you don't allow th entries to the selected Groups in Group Details Tab.
Do Not Allow Entry W/o Group Selection: Check the box if you don't allow th entries to the selected Groups in Group Details Tab.
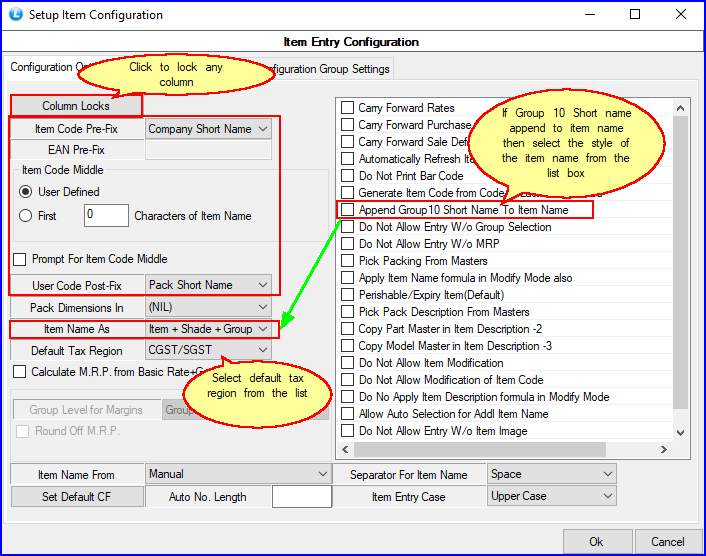
Fig 6. Configurations
Fig 7. Column Lock
|
![]() To Modify Item select the Item from the Item Tree that has to be modified. Make the necessary changes and click on Save button or Press Alt+S to save the changes.
To Modify Item select the Item from the Item Tree that has to be modified. Make the necessary changes and click on Save button or Press Alt+S to save the changes.
![]() To Delete Item/Pack click on Delete Item button or Press Alt+M. The Item Selection form will open. After selecting the appropriate options click on Search button or Press Alt+S. The Item Names will be displayed in the list. Select the Item Names that are to be deleted and click on OK button. A message box asking for confirmation will be displayed and clicking on Yes button will confirm deletion.
To Delete Item/Pack click on Delete Item button or Press Alt+M. The Item Selection form will open. After selecting the appropriate options click on Search button or Press Alt+S. The Item Names will be displayed in the list. Select the Item Names that are to be deleted and click on OK button. A message box asking for confirmation will be displayed and clicking on Yes button will confirm deletion.
|
The items that are deleted will no longer be visible in Item tree. The Items which have transactions associated with them cannot be deleted. Click on Refresh Tree button to reflect the changes in the tree.
|
![]() Filter
Filter
The Item tree can be filtered on the basis of the Item Name. Enter the first character or number of the item in the text box > click Refresh button or press Alt+R > the items with the entered first character or number can be displayed under the tree.For example : if the entered number is 7(as shown in above figure) then the all the items having 7 as prefix can be displayed:
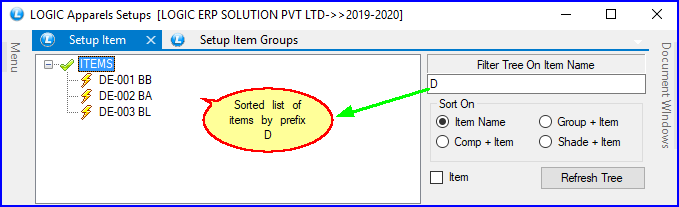
Fig 8. Filter Tree
![]() Sort On
Sort On
In the Tree items can be viewed in four sorted ways-
![]() Sorted By Item Name
Sorted By Item Name
![]() Sorted By Group+Item
Sorted By Group+Item
![]() Sorted By Comp+Item
Sorted By Comp+Item
![]() Sorted By Shade+Item
Sorted By Shade+Item
![]() Item Name: Select the option from the Sort On frame and click on Refresh button or press Alt+R (The tree may be Automatically Refreshed if the option is checked in the Configuration). The tree displayed the items by the Item Names.
Item Name: Select the option from the Sort On frame and click on Refresh button or press Alt+R (The tree may be Automatically Refreshed if the option is checked in the Configuration). The tree displayed the items by the Item Names.
|
The Tree can be set to automatically Refreshed this option is available in the Configuration. Click the Configuration button or press Alt+F > check the Automatically Refresh Items box and click ok.
|
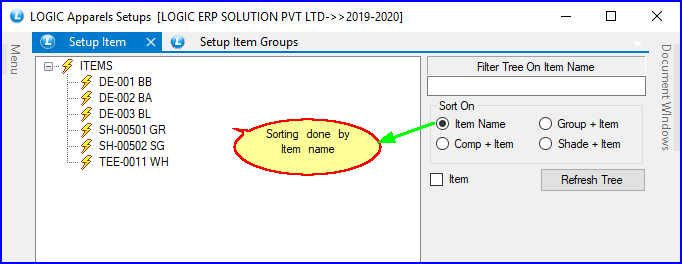
Fig 9. Sort On (Item Name)
![]() Group+Item: If this option is selected then the items are sorted by their Groups under which they are allocated. Select the option from the Sort On frame and click on Refresh button or press Alt+R (The tree may be Automatically Refreshed if the option is checked in the Configuration).
Group+Item: If this option is selected then the items are sorted by their Groups under which they are allocated. Select the option from the Sort On frame and click on Refresh button or press Alt+R (The tree may be Automatically Refreshed if the option is checked in the Configuration).
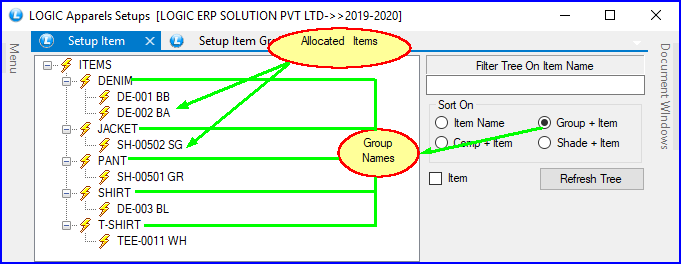
Fig 10. Sort On (Group+Item)
![]() Comp+Item: If this option is selected then the items are sorted by their Company Names under which they are allocated. Select the option from the Sort On frame and click on Refresh button or press Alt+R (The tree may be Automatically Refreshed if the option is checked in the Configuration).
Comp+Item: If this option is selected then the items are sorted by their Company Names under which they are allocated. Select the option from the Sort On frame and click on Refresh button or press Alt+R (The tree may be Automatically Refreshed if the option is checked in the Configuration).
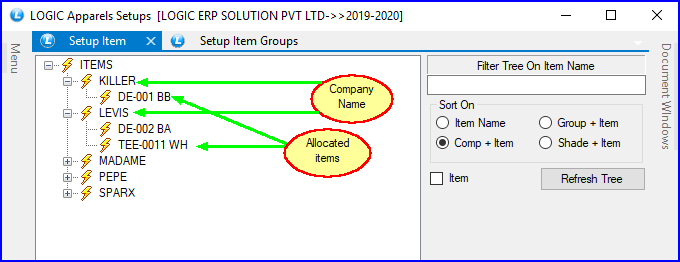
Fig 11. Sort On (Comp+Item)
![]() Shade+Item: If this option is selected then the items are sorted by their Shades.For example: All the items with 1011color code can be displayed under 1011shade. Select the option from the Sort On frame and click on Refresh button or press Alt+R (The tree may be Automatically Refreshed if the option is checked in the Configuration).
Shade+Item: If this option is selected then the items are sorted by their Shades.For example: All the items with 1011color code can be displayed under 1011shade. Select the option from the Sort On frame and click on Refresh button or press Alt+R (The tree may be Automatically Refreshed if the option is checked in the Configuration).
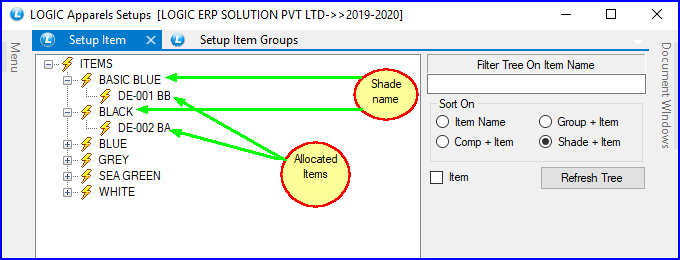
Fig 12. Sort On (Shade+Item)