|
Setup Customer Status |
  
|
| Show/Hide Hidden Text |
|
Setup Customer Status |
|
| Show/Hide Hidden Text |
![]() This form is used to define customer status example defining categories of customers etc.
This form is used to define customer status example defining categories of customers etc.
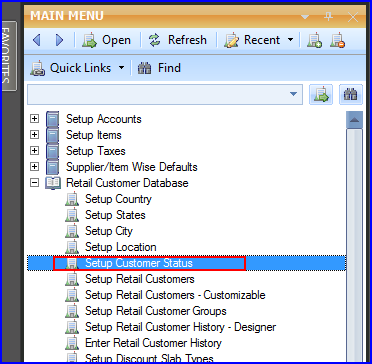
![]() Setup Customer Status: Main Menu > Retail Customer Database > Setup Customer Status.
Setup Customer Status: Main Menu > Retail Customer Database > Setup Customer Status.
Fig 1. Main Menu |
![]() Customer Status: Enter the customer status manually, it is a mandatory column can't be left blank. Customer status must be unique.
Customer Status: Enter the customer status manually, it is a mandatory column can't be left blank. Customer status must be unique.
![]() Short Name: Enter the short name manually, is a mandatory column can't be left blank. Short name must be unique.
Short Name: Enter the short name manually, is a mandatory column can't be left blank. Short name must be unique.

Fig 2. Setup Customer Database
|
To save the data entered by the user, user have to press enter button and the cursor should be on next line in the grid. |
To delete the entry, there is Red Cross in the tool bar. Select the location and click on the cross. A delete confirmation dialogue box will come, press Yes to confirm deletion.
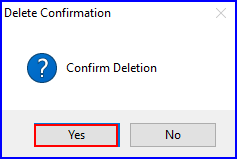
Fig 3. The Delete Confirmation dialog Box
There are three Buttons available in the bottom of the Grid Order Button, Save Button and Close Button.
![]() Order Button: Click on order button > List To Order displayed. When click on order button the caption changes into Set in alphabetical order. Click on this button arranges the list into alphabetical order.
Order Button: Click on order button > List To Order displayed. When click on order button the caption changes into Set in alphabetical order. Click on this button arranges the list into alphabetical order.
![]() Save Button: Click to save the changes made by user.
Save Button: Click to save the changes made by user.
![]() Close Button: Click to exit.
Close Button: Click to exit.